BadToxic Discord Server | GameMaster Discord Server | BadToxic on Twitter
BadToxic on Instagram | BadToxic’s Dev Instagram | BadToxic on YouTube
##navigation## ##header## ##abschnitt:2016##
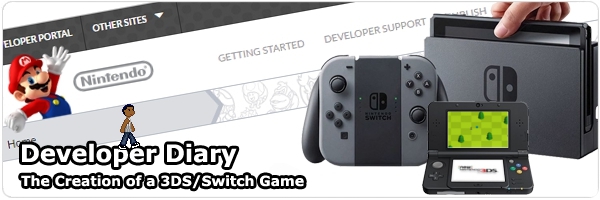
##titel:Part 1: Welcome to the world of video game development!## Part 1: Welcome to the world of video game development!
Today we are starting a new series to bring in some variety – a developer diary. I (BadToxic) recently acquired the rank of a Nintendo developer and started making a game that I would like to publish for Nintendo’s new home console, Switch. My work actually began as a 3DS app, so a version for said platform isn’t out of the cards, either. Since the development process takes a lot of time and it will be a while before we see a finished product, I would like to focus on Nintendo Switch as my primary platform.
In this diary I want to keep you updated on my progress and also show off what I have so far. You get to see the other side of the industry – for all those who would like to know more about how a video game is created. I will also go into other topics related to developing a game. For example, how do you become a Nintendo developer? What do you have to do? Maybe some of you aspire to be a developer themselves someday. And I want to make this series interactive. Comments, questions and feedback are expressly welcome and encouraged! From time to time I will ask you about your opinion in the form of short surveys so that you can help shape the direction if you feel like it.
It should be noted, however, that I am doing this on the side and therefore can not work regularly on this project. Besides, I’m tackling this huge project all by myself. Those familiar with the seemingly endless list of names in the end credits of big video games can surely imagine that this is a big, very time-intensive challenge which requires experience a variety of different branches.
That should be it for the beginning, so I’m curious: What do you think of this new series? Are you curious how it will turn out and would you like to contribute? Or does it not interest you at all since you are only interested in the end result? By the way: Even though I call it a „Diary“, you can not expect new parts on a daily basis. Updates will follow at irregular intervals and may also depend on the amount of interest this project receives. I am looking forward to your support and hope that I can entertain you a little!
P.S. The diary is also published in German to reach a larger group of people. ##neue_seite## ##abschnitt:2017##
##titel:Part 2: It all begins with a first idea## Part 2: It all begins with a first idea
Today I would like to tell you what kind of game I’m working towards but please don’t tell anybody. We don’t want anyone to steal my ideas, right? 😉
I personally believe that the idea has great potential and should prove interesting to many gamers. Its working title is „Game Master“ which should be quite appropriate. As the name already suggests, it will be the goal to master games or rather to become master of the games. Imagine a game comparable to Pokémon where you walk through various places of an overworld map and find… well, not Pokémon, but mini games! Yes, you read correctly, you are „attacked“ by a game and you are fighting against it by playing it. Depending on how well you do this, you have the chance to „capture“ it. Your first goal is clear: Gotta catch’em all!
Of course you can also evolve these games. At the beginning they may be only in black and white or on a quality level akin to Game Boy games – slow, sluggish, „hard“. But the farther you advance in this game, the more status points you or the game get to distribute among the various „skills“ of the game. Some skill categories would be graphics, audio, difficulty and AI, for example. So you might turn an 80s Pong game into a 3D Pong with powerups and particle effects.
Instead of Poké Balls, you use different cartridges or other data storage devices. From chunky modules to cassettes, CDs and small microchips. Certain game levels may require a specific storage device as a minimum baseline to capture them. These devices could be console-specific so that you need various consoles to use them. Said consoles would combine various properties themselves – one might be portable and only able to play small storage devices, while another would act as a stationary companion system that is compatible with a newer-generation device. Consoles can then be found, won, or bought. There are many possibilities.
To top it all off and link it to current events, I would set the game in a virtual reality space. So you are already in a digital world: A research project on an artificial intelligence, which is based on neural networks and was created in order to create the perfect game, has gone awry. The created AI has encrypted all the data of the research institute. It does not want to release it until someone has conquered the game world the AI has created. According to the AI, this will act as a sufficient incentive to play its game and it wants to take the opportunity to learn more and further improve the game. Thus the story encompasses many societal-critical topics of the current generation (VR, ransomware, independently thinking and acting AIs, etc.).
While there’s still a lot left open, this should prove to be a good first look at my ideas. Now I am very curious what you think of it.
Do you prefer to read this diary in the developer’s mother tongue? Then click here to read this diary entry in the original German language! ##neue_seite##
##titel:Part 3: The requirements## Part 3: The requirements
What is actually needed to create a video game? And how can I develop one for a Nintendo console? Who is even allowed to do so? If these questions are on your mind, today’s diary entry is just right for you because this time I would like to address these first hurdles and steps of a game developer.
Times are changing. In the past, it was much harder to create a game. Appropriate tools were rare and lots of basic knowledge in programming was required. Today, there are a lot of programs for creating games which are advertised as not requiring programming knowledge and being easy to use. And this is really true! Even as a newcomer, you can quickly created a mini game using drag ’n‘ drop by following a tutorial. But soon you’ll reach your limits or rather the limitations of the software. One such software is the GameMaker by yoyogames which I don’t want to omit since I myself worked with it for a long time and I think that this IDE (integrated development environment) is perfectly suitable for learning the basics and can also produce decent cross-platform applications.
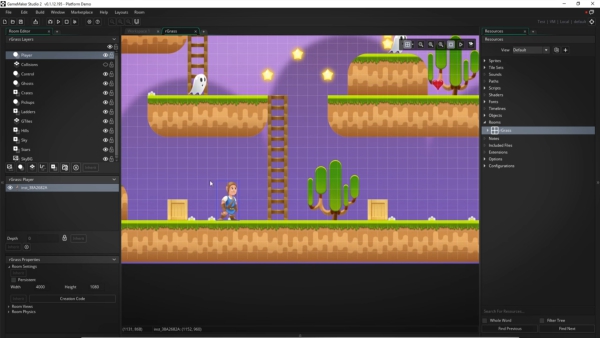
I can tell and teach a lot about GameMaker but even with its cross-platform abilities, the 3DS and the switch are not (yet) supported by it. So instead I would like to take a closer look at the IDE I’m using now and just refer you to an older article of mine on the topic of GameMaker.
Currently I’m working with Unity, also a software for developing cross-platform games. For a long time the costs for Unity discouraged me from buying it but now the price model has changed. Now you have to pay only if your software makes a certain amount of money in a year. Its 3DS support is quite a recent thing, too. Perhaps you saw the collection of logos of companies involved in Nintendo Switch game development – here you also can find the logo of Unity. While I’m developing specifically for the 3DS now, later I would like to set the Switch as the primary goal. It is beneficial to optimize the game for the weaker platform and lower resolution first because getting it to work on stronger systems later down the line is much easier than the other way around. Should everything go well, the game finds its way to both consoles.
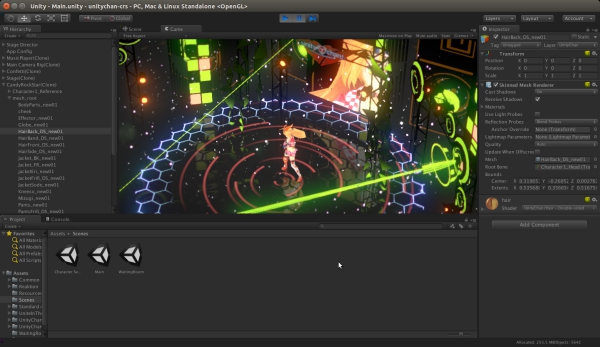
Unity is a program that offers a lot of functions and tools to simplify the creation of a game. There is a 2D and 3D editor in which levels and worlds can be created. It has its own powerful engine and sophisticated libraries for programming. In terms of programming languages it features C# and Javascript. I don’t want to get into which languages are best for game development. There even are languages that were specifically invented for video games. You should definitely not be afraid of higher languages and do not choose the IDE based on the language but rather the language based on the IDE you want to use. A good programmer does not need to master a language to use it. There is a lot of documentation and tutorials on the internet to help you out cobbling something together and if you do it for a while, you also get to know the language better. A piece of advice from me: If you already know something, do not restrict yourself to just that field of knowledge and be prepared to learn something new! And those who are new to the field should not let themselves feel intimidated by everything. There are many good tutorials for Unity. I definitely recommend not to start the big dream project, but first a few other small projects – reprogramming simple games, for example.
Should you now feel the urge to download a free copy of Unity, be aware that you can’t just program games for Nintendo consoles with that. No, you need to get a special version of Unity from Nintendo including the required SDK (Software Development Kit). However, getting this has become very easy lately. Before, there were quite a few requirements that could not be met by everyone. For example, you needed proof of a „successfully“ published game before you could apply as a developer at all. Today, everyone can get a developer account for Nintendo as long as they agree to certain terms and conditions. Depending on your age you may require help from a legal guardian that’s just how every business works. What’s definitely necessary, though: You have to have a good grasp of the English language. You may be able to get by if you know Japanese, too, but unfortunately you can not expect all the contracts, instructions and documentation in every possible language. If you would like to look at the whole thing a bit more, you can do this here.
Some of you may now ask themselves: How do you get such a game on the device? You can’t just put in on a SD Card and get going, after all. Otherwise there would be tons of pirated copies on the internet that everyone could use with ease. No, for this some hardware is necessary which you can also find and order on the previously mentioned page. There are lots of different devices which are not exactly cheap. Here, the hobby-programmer should think over exactly what he is actually going to do. Although I’m sure the prices might interest you, I will not reveal too much outside of the Nintendo developer portal. Still, if you want a reasonable solution you should not let a four-digit price tag deter you. Maybe you also know someone who already has an important device so you don’t have to buy everything yourself. Of course there is ways to get your game on an already owned 3DS, even without these tools. But I don’t want to get into details here because these processes, as you can imagine, are associated with actions that would also allow the illegal use of third-party software. It should also be noted that as an official developer you must renounce any kind of „homebrew“, meaning you can’t publish anything in the hobby developer scene for the respective consoles and certainly not with the material Nintendo provides you with.
And with that I want to wrap up this diary entry. I hope you could catch a few new insights and please don’t feel intimidated by the few hurdles mentioned above!
Do you prefer to read this diary in the developer’s mother tongue? Then click here to read this diary entry in the original German language! ##neue_seite##
##titel:Part 4: Final preparations## Part 4: Final preparations
We have a game idea, we know that we want to implement it with Unity and we know where we can get everything we need. But before we really get going, we should make some preparations. Today I would like to talk about a few things that should be clarified before we start. First, we should definitely install the IDE Unity and the 3DS SDK, if we haven’t done so already. Nintendo offers a software bundle on their developer portal, which provides you with all necessary packages and keeps them up-to-date. Non-Nintendo developers can download Unity directly from this homepage. All right, what else do we need?
Version control system (VCS) – git
How do you actually split up a project for several people when these people have to work on the same things while doing so as independently from each other as possible? These and many other questions are answered by a tool for (distributed) version management like git. Thanks to git, multiple people can even edit text in the same file at the same time without problems when the different versions are merged. As long as there are no conflicts, such as multiple people changing one and the same line, git will combine them automatically. This tool also allows you to reset the state of your code or the entire project back to any previous state at any time. All you have to do is send a „commit“ after each major change to the server running git, which in turn creates a snapshot of the project.
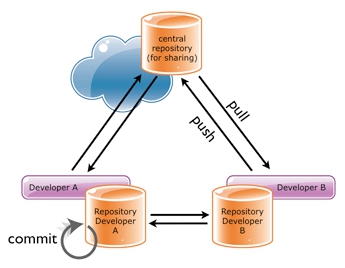
Image source: Smashing Magazine
If you are curious about what else git is capable of, there are whole books written about it. It’s a very complex topic. Maybe you are wondering why I use a VCS when I work alone on this project. There are several reasons. First, the commits you send are annotated. These comments are shown when you browse through the history later, turning git into a kind of diary. This makes it much easier to determine what you’ve done and when. In addition, you can save your project regularly and efficiently on a different computer. Git only backs up changed data. Doing this manually, you would have to search for changed files and copy them individually, or copy the entire project. With git, should the hard disk, the PC or even the project itself be defective, you can restore any state at any time.
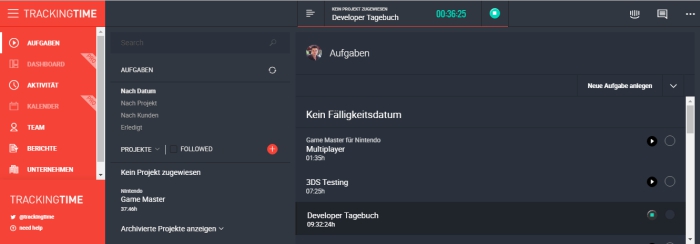
Time Tracker – TrackingTime
Another useful aid is a tool for tracking the time you spent on different tasks. I was often asked how long I needed for a particular project and couldn’t give an exact answer. „Just over a year“ – what exactly does that mean? Maybe I also could have done it in a month. In order to give a more meaningful response, one would have to know the hours or the working days with a fixed number of working hours. Besides the ability to give information about your working hours, you also have the chance to estimate the actual value of your project. Here, a time tracking tool like TrackingTime can help. It can be used to create a variety of tasks such as „Learning Unity“, „Inventory“, „Title Screen“, „Character Design“, „Mini Game XY“. After that, you can comfortably start a timer of the respective task by pushing a button and after you have finished it or if you want to take a break, you can stop it again. The results can then be sorted by tasks or displayed in a calendar. For a single person, a simple text file or a sheet of paper is definitely sufficient, but why wouldn’t you want to use a convenient, free service which makes everything easier?
Advertising / Community
If you ask professional game developers, or they report on their own, how much effort and cost they put in the respective areas of game development, you might be surprised. Often you hear that programming is the smallest part, maybe about 20% of a project. This, of course, varies tremendously between games because some put the most value in their graphics, sounds and story. However, I found it particularly surprising how enormous the advertising share can be. Some developers, especially for mobile games, often say that the cost of advertising measures over 50% of the total project. This isn’t even limited to classic video clips and banner ads but rather social networks such as Facebook and Twitter. Usually, the majority of advertisement takes place shortly before and after the release of a game. But it is also said that one can never start early enough. There are also projects which start with advertising even before they begin the development process. And for that reason I am talking about it in this section and count it as prep work. To me, it makes sense to think about it from the beginning. But at least in the final phase, it is imperative to take advertising measures, especially considering the large quantities of games released on a daily basis. In my case, this diary could be interpreted as a commercial measure. Of course, this is not the reason why I started it but I certainly also wish that this article series may create a small community.
That’s it for now, although I could probably still list a lot of things. In my next diary entry I would like to finally start with the development!
Do you prefer to read this diary in the developer’s mother tongue? Then click here to read this diary entry in the original German language! ##neue_seite##
##titel:Part 5: Ready to go## Part 5: Ready to go
Now that all the preparations have been made, we can finally get going. Our project is very complex and there are a lot of open questions. People with experience in extensive projects can certainly confirm that good planning is the key to an effective approach. On the basis of my game idea, you could start planning how everything should be implemented several weeks in advance but you’d have to iterate over everything multiple times. For me, however, I have determined that it is more efficient to isolate parts that do not depend on further planning and implement them immediately. It’s a difficult task to find such parts. Also, Unity and C# are still very new to me and I do not know much about their capabilities. That’s yet another reason to start with simple tasks and continue learning in the meantime.
The World and the Player
As a starting point, I decided to create a world where I can walk around and start a game with certain interactions, which I will soon be sketching. Everything should be kept as simple as possible so that nothing has to be unnecessarily redone. The world is just a flat surface. A controllable character, initially represented by a cube, is placed on top of it, in addition to another cube which, upon interaction, starts a game. I won’t discuss how the individual steps in Unity work. There are already enough tutorials on the internet and most of the problems can be solved intuitively. Now we want to be able to control our player, so we assign a new script to him which is responsible for handling all player activities. By now, the first platform-dependent question comes up – how do I know which key is being pressed? This is where our Nintendo 3DS SDK comes into play. It provides functions that can be used to check whether a key is currently pressed or not. Unity allows individual code sections to be marked to run on specific platforms only. Thus, I can specify that the 3DS is to be asked about the keystrokes via variant A and on another device via variant B. For each direction in which we want to walk, we assign the appropriate button to set a speed value for that direction in our character script. With just a few simple settings, Unity’s Engine will then independently performs tasks such as collision handling and friction. Our cube will no longer fall through the ground and will be slowed down while moving around.
This is a character I can identify myself with
Character design is a very tricky task. It is certainly one of those challenges that could be put aside for a long time. But I have no real desire to push a cube through the area forever while I test new functionalities. I’m also curious about how things work in Unity. But can I already decide what type of player I would like to end up with? Do I use a fully modeled 3D person or rather nostalgic pixel sprites? Do I control a human being or can my avatar be an animal, a fantasy monster or even an object? The scenario of my game idea allows a lot of creative freedom here. In my case, the required effort should play the most important role, apart from my lack of experience in 3D modeling. I’m much better at the creation of sprites and drawing. Nevertheless, I didn’t want to decide on a certain style based on my skillset but rather experiment with the technique that seemed simpler to me. So I chose a pixelated 2D variant in the form of a small human which I had already created for another project many years ago. It was therefore necessary to find out how to represent and animate a two-dimensional figure in three-dimensional space – a technique often referred to as „billboarding“. Even if I’m going to replace this variant later on, the effort would not have been in vain, because this technique can be used in many cases. Now the simple scenario looks much more comforting, with a graphic style reminiscent of Paper Mario a little bit.
The first interaction
Now that we can walk through our world, we also want to be able to interact with it. The player should then be able to run to the previously mentioned second cube and „use“ it. Using the already existing collision handling, the cube and the player can be matched up to each other in such a way that a specific method is called for the player in each step. Simply put, a „step“ is the interval between two code executions. This may correspond to the change from one frame (rendered image) to the next, but could as well be frame-independent. In general, we should not assume that each of these steps takes the same amount of time, such as 1/60 second, with a refresh rate of 60FPS. As long as the player is next to the cube, this method checks if a certain key is pressed. If the „action key“ is pressed, our first mini game starts. Further details of the implementation of this game will be highlighted in the next diary entry.
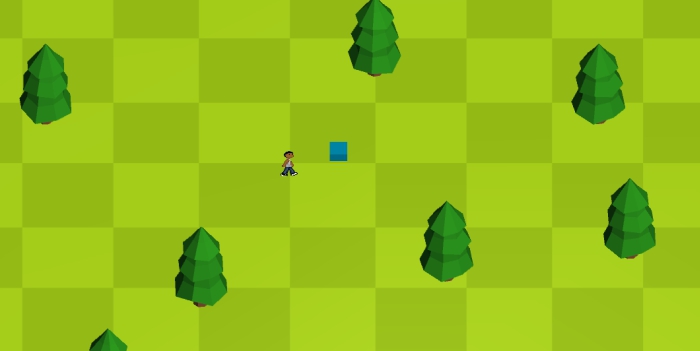
The current state: A character can walk through the world.
At this point, feedback on the content of my diary entries would be helpful. Do you think I go into too much detail, or do you want even more in-depth information, perhaps supported by code examples? I would like to adapt my style to your wishes, if these clearly go in a specific direction. See you next time!
Do you prefer to read this diary in the developer’s mother tongue? Then click here to read this diary entry in the original German language! ##neue_seite##
##titel:Part 6: GONG! The first mini game## Part 6: GONG! The first mini game
Our character is ready to start a first mini game. Time to create one! The objective is to create a simple game so that we have a working one to implement and test other things with. This includes, for example, the connection and switching between the world and the games. The game itself is not so important for now. When I think about which game is easiest to implement, Pong always comes to my mind. Two rectangles that can move vertically and a ball played back and forth between them. It would be nice, of course, if the game had something more to offer, but this is something the player may add with the aforementioned game development mechanics that’ll become one of the core features of my project. So it’s decided: We are programming a Pong clone! Although there is no legal problem to create such a thing, we want to at least come up with an own name for it. How about a more powerful beat instead of a „ping“ and a „pong“? Let’s call it „GONG!“ for now.
The game itself is relatively easy to implement: We draw vertically enlarged cuboids on the left and right side on the screen with another cuboid in the middle which represents a nice angular ball. When we start a round, the ball is accelerated in the direction of a player. Which player receives the ball is randomized. The player can use their own movement to determine the rebound angle of the ball and thus try to send the opponent as difficult shots as possible. If the ball passes behind a player, this gives one point for the other. Once a certain score is reached, the player wins. The opponent could be a second human player. I’m thinking of the advantage of the Joy-Cons of the Nintendo Switch here – these can be split among two players. It would be possible to play together with one 3DS, too, even if it is much less comfortable. My project would not be the first to offer this option. But since we also want to play and test alone, we create an AI (Artificial Intelligence) which we can compete against.
It’s alive!
You don’t need much to breathe life into the opponent. We create a method that is executed in each frame and moves the CPU (computer-controlled) paddle towards the direction of the ball. In doing so, we take care to make this movement is not too unrealistic, meaning the paddle does not move faster than it would if it were controlled by a person. The CPU should follow the same rules as a human player. Since the ball can move faster on the Y axis (vertically) than a paddle, this AI quickly reaches its limits and can easily be tricked out. It should therefore learn to think ahead. To achieve this, the AI can calculate where the ball will arrive on the Y axis at its current speed. However, this would make the AI play perfectly and therefore never lose. We have to find a solution in which one can win but not with ease. I have solved this by letting the AI predict only a few frames instead of the impact point of the ball. Depending on how far the CPU can look into the future, it’ll play better. This foresight may also be used to introduce different selectable difficulty levels.
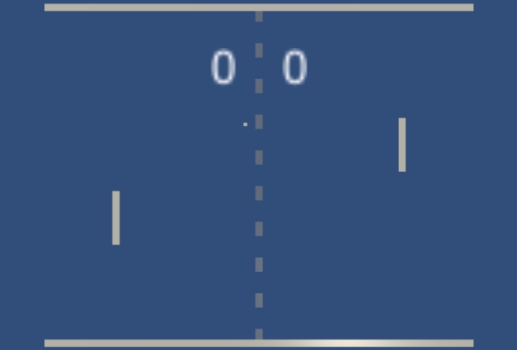
The first mini game: GONG!
Let The Games Begin!
Our GONG! is ready for first gaming fun! Of course, there is still a lot of logic running in the background. When a player scores the next round is started. This resets the ball and the player to their starting positions. The player against whom the point has been made will open the next round. There should be enough time between the events to allow a human player to realize what’s happening. A button allows to pause the game. During this, the movements of the ball and the players are interrupted. The motion vectors (direction and speed) are saved and reassigned to the objects after the pause is ended. So far we don’t have an end after reaching a certain number of points or something like that.
Development potential
GONG! still has a lot of potential for features. How about four players instead of just two? Instead of the walls at the upper and lower border of the screen there could be another two players. Or how about a double? On each side, two players either split the playing field into two halves or use the complete vertical with a slightly offset to each other. For this, we should also raise the difficulty by using two balls at the same time or increasing the speed of this one ball. The number of players and difficulty levels should be part of the developable abilities. The same goes for the graphics. The simple cubes could be replaced by pretty detailed and colored shapes.
For now I would like to go back to the „Overworld“ and to start another very important basis of the project – the inventory. I want to add something to this inventory that we can use to start GONG! instead of walking to the start cube. However, the inventory will be the subject of my next diary entry.
Do you prefer to read this diary in the developer’s mother tongue? Then click to read this diary entry in the original German language! ##neue_seite##
##titel:Part 7: The Inventory## Part 7: The Inventory
A basic part of the mechanic in our project is carrying and using various objects. In order to do this, today’s diary entry will deal with the inventory. We would like to see a number of storage slots on our screen into which we can place our items. It should be possible to rearrange items via drag and drop. In addition, we want to have the possibility to combine items with each other or stack them. Some items will be used directly by tapping them.
In line with the current development progress of the project, the first items we create will be designed to start our first mini game GONG!, which we came up with in the last diary entry. For this, our player is supposed to carry a portable console on which the game is then started. In addition to the console we need the mini game itself in the form of a cartridge as well as a suitable power supply in the form of batteries. My idea for the first console is a kind of GameBoy in which you have to insert a game and two batteries to use it. For copyright reasons I call this handheld „GameGuy“. If this GameGuy is tapped, a window opens which offers more slots that will only allow one game module and two batteries to be placed in them.
You should not reinvent the wheel
Of course there are already many games that use a kind of inventory – it is nothing extraordinary. For this reason, it is a good idea to look for a finished implementation that you can use first, rather than reinventing everything from scratch. Even if you want to do everything yourself, there is no harm in looking at other variants for inspiration.
Unity provides the so-called AssetStore which provides a variety of resources for your own game development. Here we find graphics, audio files, 3D models and also entire engines and systems such as inventory systems. Fortunately, you won’t have to pay an arm and a leg to afford them – there are a lot of free offers as well. After some searching and comparing, I found the package „Inventory Master – uGUI“. This allows us to use various typical inventory components. For example, there is a main inventory, a kind of quick access bar and a crafting system. There is also a database in which you can create new items. Drag and drop functionality is already available. I imported this package into my project and inspected it more closely. The inventory system turns out to not quite offer what I imagined but it could be used as a solid foundation. In the end, though, I’ve changed so much that maybe it would have been easier to make it all myself but I could learn a lot and adapt some mechanisms.
The implementation of the inventory has confronted me with many challenges and was a long-winded process. Nevertheless, I would not like to go deeper into the matter and rather report on the results. In the end, my item database currently contains the following items: A GameGuy console in two variations, a game cartridge with GONG! and a 1.5V AA battery. Each type item has a small picture of size 64×64 pixels. They are subject to a certain type-hierarchy in order to simplify and abstract various logical processes later on. This is called inheritance. For example, the GameGuy is a console or even a handheld and an AA battery is a special type of „battery“. This helps with certain checks. For example, you can only insert certain batteries and data carriers into a (portable) console. If you try this, it is checked in detail whether this type of battery fits into this type of console. This way I can handle logical queries hierarchically and effectively as well, rather than checking out large, confusing lists of possibilities in the end.
After that I created a GUI (a window) which offers three slots as described above. The first one only allows GameGuy cartridges to be placed in them while the other two are reserved for one AA battery each. Only when these slots are filled, a start button is activated with which the mini game can be executed.
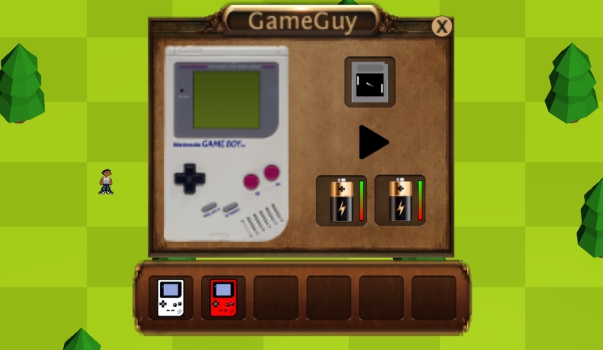
Inventory bar with open GameGuy interface including the game and batteries.
The game cartridge can be linked to one of the mini games and accordingly carries a suitable cover image – as seen in the picture above. The batteries also need a charge. This is represented by small bars next to the item. While using the console, this charge is slowly depleted. If at least one of the batteries is empty, the console will turn off automatically. A small battery indicator prevents this from happening unnoticed during play.
The batteries and the game cartridge can either be dragged into the slots of the console window or directly to the console. In both cases one of the corresponding slots still must be empty, of course. If you drag an item into an already occupied slot, the two items exchange their positions. An exception are stackable items which can be combined into one slot but I don’t plan to add anything like that for now. At least batteries aren’t viable for stacking because their different charges would make it rather confusing.
With this we now have a solid inventory system which prove itself as an important component throughout the entire project. In the following diary entry, we will deal with saving and loading of our progress since we are able to carry out first changes of states now which we want to keep, of course.
Do you prefer to read this diary in the developer’s mother tongue? Then click here to read this diary entry in the original German language! ##neue_seite##
##titel:Part 8: Saving & Loading## Part 8: Saving & Loading
Now that we can change first states in the game like positions of objects in our inventory, it’s time to deal with a save system. Again, there are some aspects that should be well planned beforehand and others that can be addressed immediately. As you may know from other games, there are different variants of saving systems. In some games, saving is restricted to certain locations or to certain events. In others you can interrupt and save the game at almost any time. Some games only save automatically and some may allow you to do so manually, too, while others can only be saved manually. Often, there is a fixed number of usable savegame slots while other games theoretically allow an infinite number of game slots, provided there is enough memory available. There are several reasons for these differences. On the one hand, it should fit the general theme of the game and not, for example, have a negative impact on the mood due to long waiting times or have frequent saving make the game too easy. Especially in the case of older hardware, such decisions are strongly influenced by the technical aspects, such as a low memory capacity.
Integration into the game
I would like to have the possibility to save by pushing a button, even if only for testing purposes. Later, I might change it to have the game save its state by itself but that depends on how long the process takes on my target platforms. If the game were to take a second or longer to save after each action that changes a state, it would affect the game flow too much. But perhaps I would like the player to not be able to backup every step and to reverse wrong decisions. In that case, I should give them no control over the system. I will leave the decision for later in order to be able to match it better to the rest. Alternatively, I had the idea that you could carry some kind of diary as an item in the inventory with which you can save at any time. The player will then be allowed to get rid of this object if he wants to do so.
So I start with two small buttons labeled „S“ and „L“ with which I can save and load at any time on the overworld map. For now, I just want to save the position of my character and the items in my inventory. Next, I thought about the file format in which I want to save the game. There are easy-to-read formats, such as XML or JSON, and binary variants which are illegible to people. The first variant is easy to understand and change – practically an open invitation to cheat. The second one consists of unreadable strings of ones and zeros which require much less space than written out words. Especially on consoles, where the storage space plays a bigger role and the savegame files are hard to reach and change with a text editor, legibility definitely plays a smaller role compared to saving memory.
What and how to save?
In previous projects, I’ve always created the savegames manually, so the files got written and read by their own code. For this you have to take care that all sequences always remain the same and that everything is complete or can be bypassed when something is missing. With Unity, you can make your life easier by creating serializable data objects that can then be automatically saved and loaded (see Serialisability on Wikipedia). This can not be optimized as easily as a manually created procedure but it simplifies and speeds up the process considerably. While I can simply add a new variable to such a serializable object, which is then stored, a manual variant would have me write each variable individually into the file.
So I create a serializable object with a variable for every value that I want to store. In my case, it’s the X and Y coordinates of my character, but not Z because we can only move on a flat plane at the moment. This also serves as a great example for how much room for optimization we have:
1. I drop unneeded information like the Z-coordinate.
2. Range: Depending on how big the world can be, you could limit the coordinates. For example, smaller data types may be sufficient for which less space has to be reserved. (For example, a sbyte covers values from -128 to +127 and short for -32.768 to +32.767.
3. Accuracy: The above mentioned data types can only keep integers. So I throw away the digits after the decimal point. I could also stretch or compress the value range and „encode“ it differently – divide it by eight before storing and multiply it by eight after loading.
4. Alternatives: Instead of the coordinates, I could use fixed locations that work as predefined save points and save me the trouble with the big numbers. I would only have to remember the locations, maybe in the form of a much smaller number.
In addition to the coordinates, we need to take care of the items. With these it is somewhat more complicated since, theoretically, there can be any number of items and even whole inventories. Examples of other inventories would be chests or items that can contain additional items, such as our GameGuy. For the time being, I limit myself to the inventory of my character, which can be a list of items of any length, and another place for items – the previously mentioned GameGuy.
Abstraction levels
Even when saving, there are advantages to using inheritance and abstraction. On the one hand, there is save data for the main game itself, as mentioned above. In addition, there is data for separate mini games as well as shared data between all of them. For example, all games should have a level and therefore experience points must be stored. The main memory file can then hold a list of mini game data, making it possible to pack everything into a single file. Alternatively, the data of the mini games can also be kept in separate files.
These thoughts, however, raised questions: Can you have multiple copies of the same game? And if so, do they have their own savegames? Would that mean you could produce infinite game data? These are questions I will not answer right now. It will ultimately depend on how much disk space there is available on the target platforms.
This should suffice for a little insight into saving and loading. In the next diary entry I would like to expand the interface between the mini games and the world – menus for several possible options are still missing, after all. In particular, I will focus on the skills system that will be placed here. This will allow us to further develop our mini games.
Do you prefer to read this diary in the developer’s mother tongue? Then click here to read this diary entry in the original German language! ##neue_seite##
##titel:Part 9: Skill tree & Menus## Part 9: Skill tree & Menus
Today it’s time to expand the link between the mini games and the overworld. Just a few games that simply start as soon as you turn on the device, as it currently is the case with our „Gong“. Usually one is greeted by a title screen, which presents the name or the logo of the game and maybe offers a first set of options. In some cases, the logos of the participating companies or a short intro come before this. I would now like to start with the part that starts or follows the title screen – the different menus. Each game should have the following menu items:
1. Start Menu: This is where specific settings for the game are made, such as the number of players and the difficulty level.
2. Options: General settings for graphics, audio, control, etc. can be made here.
3. Development: Here the skills of the game can be further developed, such as the difficulty level, graphics and much more.
4. Achievements: This option holds a list of unlocked achievements like „xxxx points reached“ or „level Y beaten“.
5. Exit game
These menus then adapt to the respective game and its development progress while reusing as much as possible. I’ll explain this with the start menu for our first mini game „Gong“:
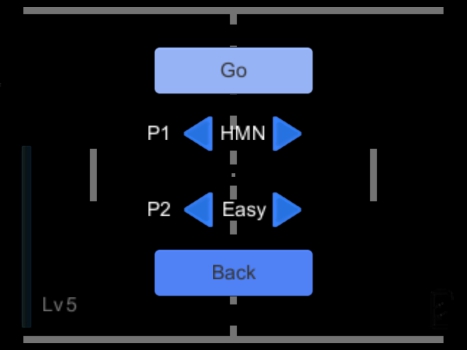
Start menu of „Gong“ before development
A start menu allows you to set the number of players and to determine who controls which player. Initially the player number in „Gong“ can not be changed since at least two players have to participate and the possibility for more than two players has not yet been developed. For both players, it can be determined whether a human or a simple AI controls the paddle. Thus, two people (even on a single 3DS) or two AIs can compete against each other. Of course you do not get any experience points in either of these cases because it would be easy to cheat the system this way or be straight-up unfair. If you have learned the skill to let more players enter, a new option appears that allows you to adjust the number of players. For each additional player set here, new options for assigning them to a human or AI player appear.

Start menu of „Gong“ after development
Putting the experience into practice
The current most important menu item is the „development“. Here we find a skill tree through which we can learn something new. Learning abilities costs skill points that we gain by leveling up. They are arranged hierarchically, as some skills are required for others. For example, you can not activate the four-player mode until the three-player mode has been learned. When you select an ability, some information is displayed in the bottom left. Any number of abilities can be selected if all prerequisites are fulfilled. These prerequisites are currently limited to learning all previous abilities. If sufficient skill points are available to learn all the selected abilities, an apply button will be activated. If this is clicked, all selected abilities are unlocked irrevocably and the skill points are deducted. After that, skills of the next level(s) of the tree could be learned.
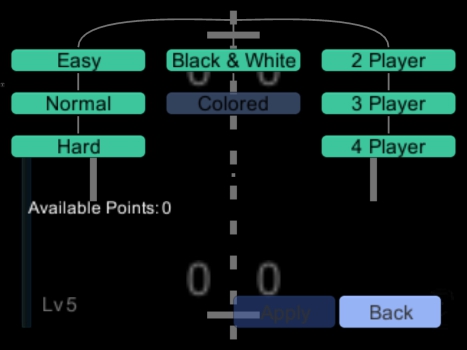
Skill tree of „Gong“
The learned skills will affect everything immediately and we can use the new options as described above. All we have to do now is to make sure that we do not forget everything we have learned – it has to be saved. For this, one bit is sufficient for each skill, i.e. a „1“ for learned and a „0“ for not yet learned. Since we have already dealt with the topic of saving and loading in the previous diary entry, I will not go further into it.
The remaining menu items are the general settings – we have none so far – and the achievements. The achievements will be treated in the next diary entry. See you next time, I’m looking forward to seeing you. 😉
Do you prefer to read this diary in the developer’s mother tongue? Then click here to read this diary entry in the original German language! ##neue_seite##
##titel:Part 10: Achievements & Notifications## Part 10: Achievements & Notifications
Last time we familiarized ourselves with the most important menus and the experience system. Today we will take a look at achievements. Each of our mini games will offer a few achievements which should be unlockable. If one is activated, a small pop-up notification will appear on the screen. From this point onwards, the achievement will be shown in a separate menu of the respective mini game.
We do not want to block these pop-ups
Let’s start with the pop-up messages. Depending on the context they are also known as „growl“ or „toast“ messages. When activated, they should be displayed for a few seconds at the right edge of the screen. There is a maximum number of messages that can be displayed at the same time – even if it is rather rare that several are activated at once. They are displayed from bottom to top beginning with the newest one. If the maximum number is exceeded, the oldest message is immediately removed. Each has its own countdown after which the message fades out. Another way to make a message disappear prematurely, for the impatient among us, is clicking or tapping the message. Alternatively clicking could trigger something like opening the achievement list of the game, in this case.
A pop-up notification shows the unlocked achievement
For the implementation of the messages, we first need a kind of container directly above the user interface. So I created another canvas in Unity, a kind of UI slide, which is put on top of it all just like I did it for the inventory. In this case, the draw order has to be observed – it must be determined which slide is in front of which. I assign this canvas to an area in which the messages are stacked vertically. I wanted to make new messages as easy as possible. The result is to call a method that expects an image and text and does the rest completely automatically. Now we can already inform our player about all possible events.
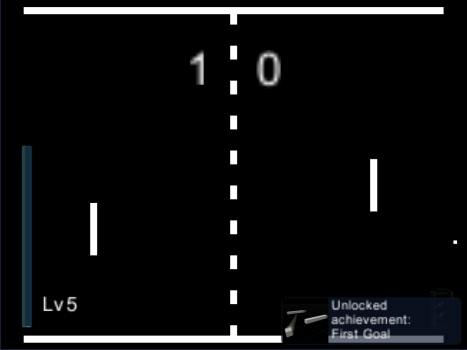
Goaaaal! What an achievement!
As you can see in the picture above, I decided to make a pretty simple first achievement. As soon as you score the first point in our first mini game Gong, the “first goal” will be unlocked. You can see that the text of the notification actually consists of different parts. There is the fixed line of text „Unlocked achievement,“ which can remain the same for each achievement, and a specific part with the name of the achievement. Actually I do not only pass the translated text to our new pop-up but the keywords used to map the text to certain language sets. The advantage of this is that the pop-up can translate itself when changing the language of the game while it is displayed. Sure, you can argue about whether this is necessary with a text that is displayed only for a few seconds but I would like to make everything perfect. 😉 And since there are, as I said, two text sections, even a special kind of pop-up had to be created, which includes two texts. Still, pictures say more than a thousand words, so we want to create meaningful images that represent the achievement. The first thing that came to my mind was a soccer goal with a „1.“ However, I decided to do something that directly reflects the current game, even if it does not seem as intuitive. You can see the results yourself.
The achievements are game progress just like the level and want to be saved. But I will not go into saving and loading here because we already had a separate diary entry about that. When building the achievement you have to pay attention to a few subtleties. For example, making sure that it is only activated if a person has actually scored this point and not the computer opponent or a player in a game of AI against AI. Everything should be as simple as possible here as well: A call of enableAchievement("firstGoal"); is enough to activate our achievement and store it in the save file. Finally, I would like to be able to see my achievements at any time and this will be realized by the menu item „Achievements“ of each game. Here we can find a list of all available achievements of the game, including those that have not been unlocked yet. However, the images are only visible for the ones we already obtained. At this point, there are still possibilities for optimization. For example, instead of the names we can display notes that provide tips for finding the achievements.
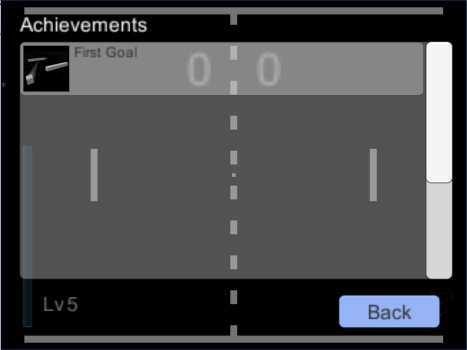
Achievement list from the first mini game „Gong“
So much for Achievements. Next time we want to deal with the in-game clock, day changes and the weather in the game to bring some change to our overworld.
Do you prefer to read this diary in the developer’s mother tongue? Then click here to read this diary entry in the original German language! ##neue_seite## ##abschnitt:2018##
##titel:Part 11: Day and weather change## Part 11: Day and weather change
This time we want to bring some change into the dreary digital everyday life on our overworld. There might be no strategic advantage to start with it so early in development, unlike most things that have been implemented so far, but a developer does not want to work with the same monotonous landscape when testing all the time. That’s why I decided to spice the whole thing up a little by the changing of days and weather. This includes changes in the weather such as sunshine, rainy weather and snowstorms, appropriate lighting conditions and day and night changing.
You do not have to reinvent the wheel of time
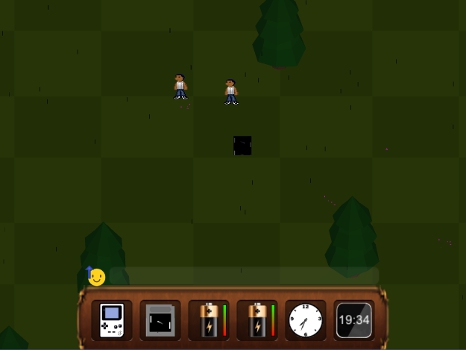
As with the inventory system, I first researched whether there are already free offers for weather and time systems in the asset store of Unity. In fact, I’ve really found one and imported Time of Day & Weather System into my project. This contains exactly the desired elements noted earlier and something more. It mainly consists of two control objects – one for the weather and one for the daytime. Let us first consider the temporal aspects. The time controller has a timer that counts at a given speed from 0 to 24 o’clock and starts again from the beginning. This includes two light sources, which represent the moon and the sun. Both light sources are directional, so they generate light beams in a given direction and not in all directions as a „point source“ would do. They both rotate with an offset of 180° to simulate the different light incident angles throughout the day, thereby illuminating objects from a different angle and throwing corresponding shadows. This, of course, is a highly simplified model of our day and night changing. In reality, the sun and the moon do not appear to be on a circular orbit, but are moving on a curved path thanks to the rotation of the earth. Also, the offset between the sun and the moon is not always the same. In real life, the sun and the moon are sometimes seen simultaneously and sometimes not. Likewise the distance of the sun, the seasons, are ignored here, as well as the light intensity from the moon, which is not always irradiated by the sun at the same amount. Our system already observes differences in the colors of our light sources, which vary according to the time of day. For example, the sunlight is slightly reddish during sunrise and sunset.
Because we would like to know how late it is in our game, I wanted to find something better than a simple display on the screen. After all, in reality, we do not know the exact time either just because the light changes. So I created two new items – an analogue and a digital clock. If you carry these in the inventory, you can read the time directly in the item slot. Of course, it would be useful if you don’t have to carry such a watch in the always visible „hotbar“ in order to see the time. A possible solution would be to make it “equippable” allowing the time or the clock will be shown at the screen’s edge.
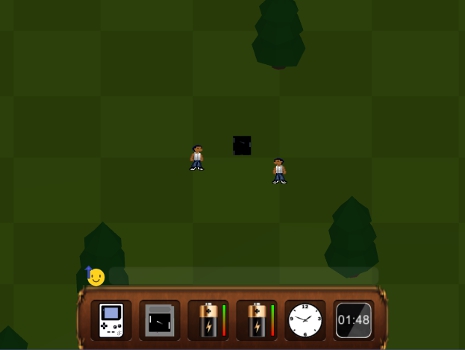
Two watches in the inventory at night
Weather change!
The imported weather system already offers the most important weather conditions: sun, rain, snow, thunderstorm and cloudy. In the case of rain and snow, there are particle systems that produce rain drops or snowflakes. Particles are very minimalistic objects that obey certain physical laws and have a limited life span. They should be as efficient as possible in large quantities without the need for too much computing power. Rain can, for example, be represented as two-dimensional short strokes in order to create the impression of fast falling drops. So you do not have to use 3D models and the rain can go through other objects, so no collision handling is needed since you could hardly see this detail anyway.
Gloom and rain – that drags the mood down
The snowflakes, on the other hand, are implemented as small white cuboids. Only a few of them have already tripped an old 3DS model in a test. Alternatively, 2D sprites as images instead of models might be conceivable as snowflakes.
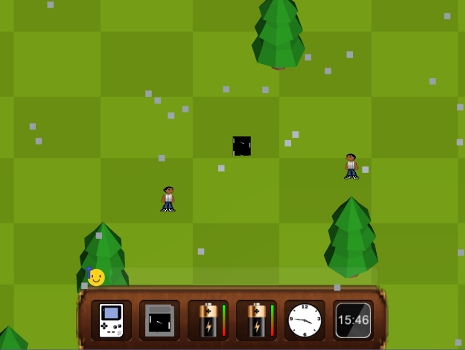
The angular snowflakes lightly reflect the sunlight
Since there is no precipitation without clouds, the environment is automatically darkened in bad weather. So the weather system also influences the light sources, together with the time of the day. A thunderstorm expands the rainy weather with lightning. These are not directly realised by visible lightning drawings, but by a short and brightly lit screen.
Now the weather has only to be determined and changed at appropriate intervals. For this, our game time is used and a bit of randomness. For example, I can determine that a weather phase lasts for a certain time – a few hours to whole days. Then the next weather state is selected by chance and a duration is set again. This process could be highly optimized to reflect the reality as precisely as possible. Depending on the localization (system language etc. as a hint) of the game world, one could represent a low-precipitation desert to rainy subtropics. However, since we are in a virtual world which is not to be based on any particular real location at the moment, I have not invested any time and left it with a relatively arbitrary random algorithm.
A difference like night and day
Right now, the new time and weather system is just a beauty detail of our world and has no deeper meaning. It will remain like that for a while as other things have a higher priority but I would already like to address a few of the new possibilities. Weather and time can have a lot of influence on the game. In many games the night stands for danger – think of Minecraft or Don’t Starve. At night, there may be more or more dangerous monsters. Maybe you even have to retreat to a safe hideout or stay near a camp fire. For our case, I’m thinking of a comparison to Pokémon: Perhaps there are gloomy minigames which are nocturnal and others who only go out during the day. Or some games differ slightly depending on whether they are played by day or by night. They could adapt themselves graphically to the respective situation or be harder at night and give more experience. In addition, time-based events are also possible. Solar batteries which recharge after a certain time in the sun and plants that need a certain time to regrow. One could, for example, build battery bushes from which battery berries can be harvested. In such matters, however, the question arises whether these things should really depend on the time in the game or on the real system time. You could also grow plants while the game is not running, like the berry bushes in Pokémon or all plants at FarmVille. Or you really need to sit out the time in the game, as with Harvest Moon and Stardew Valley.
Weather can also have a direct influence. Again, comparable to Pokémon which only can be seen in the rain, minigames can have such a behavior. Weather and time affect the temperature, another important aspect which I have not taken into account. Temperatures could also influence the minigames. And last but not least, the world itself. Waters could dry up or freeze, thus opening up new paths. The player may have to protect himself against temperatures that are too high or too low so that he will not be damaged or weakened. A good sample of all these aspects is The Legend of Zelda: Breath of the Wild. Here one should prepare with appropriate food and clothing to the different temperatures, which can prevail in different places and at different times of the day.
This was my today’s contribution to the current state of development of Game Master. In the next part I go with a very comprehensive topic: Network games! Online multiplayer and local multiplayer games over WiFi are to be realized. Until next time – and do not be afraid of feedback, questions and suggestions!
Do you prefer to read this diary in the developer’s mother tongue? Then click here to read this diary entry in the original German language! ##neue_seite##
##titel:Part 12: Network Gaming## Part 12: Network Gaming
Today we dare to tackle a huge topic: Multiplayer via network connection. This concerns games locally via WiFi with the 3DS, in the LAN (on the PC) and over the internet (on the PC). Thanks to my experience in game development, I realize it’s never too soon to start implementing a multiplayer mode as many processes need to be prepared for it. I do not want to promise at this point either that the game will really have a multiplayer mode at release or what its scope will be, as I’ve seen many developers fail to do so, which can result in delays or even cutting down or removing the mode entirely. With my explanations below it may also be a bit more understandable why this is. Nevertheless, I first need a plan in which direction the multiplayer should go, which is to be tested later. And I don’t want to avoid any efforts and risks, so I try the best that I can imagine. Optimal would be a coop mode for the entire game with all imaginable liberties. A player should be able to enter the game and the associated world of another at any time and be subject to only a few restrictions there – comparable to Minecraft. If one player is busy with a minigame, another should be able to watch and and join it. In addition, players should be able to communicate with each other.
Unity vs. 3DS
Our development environment Unity also offers a suitable solution for network multiplayer. There are tutorials and sample projects available that will help you get to know this solution better. It is a fairly comprehensive package for creating and managing network games with useful tools that you can use often. This includes, for example, a lobby in which the players can meet before a game starts or even during gameplay. At this level, you do not have to deal well with the underlying technique, such as using the TCP and UDP. Unfortunately, this system can not be used on the 3DS since certain guidelines must be followed. Our solution allows you to establish direct connections to other participants or to use a paid service from Unity which manages the matchmaking. With the 3DS on the other hand, we are obliged to connect to Nintendo’s servers first, which perform security checks before a game can be started and this thwarts our solution. In fact, we learn from sample code for connections between 3DS systems that everything has to be handled at a significantly lower level. Here we have to take care of the creation and sending of data packages ourselves.
I will not explain this issue in more detail here. But I’ve decided for myself that I’ll implement 3DS connectivity in parallel with the higher Unity variant, just initially limited to only for local WiFi games rather than using the Internet. For some of you, it may have been looking strange that a lot of 3DS games offer a local multiplayer but do no online capabilities. As you can imagine now, this is likely to have more reasons than having to „just“ pay more for network infrastructure or having to design the games for higher latencies.
Starting a game
Let us first consider the non-3DS variant. In this case, we use the lobby provided by Unity for players to meet and prepare. The player who hosts the game, in other words creates and makes it available to others, lands first in the lobby. Other players connecting to it via IP address also land in the lobby. Until the host starts the game, all participants can set a name and a color. Finished players can mark themselves as „ready“ when they are ready. Then the host can start the game. I changed the whole thing a bit so that players can now join after the game has already started.
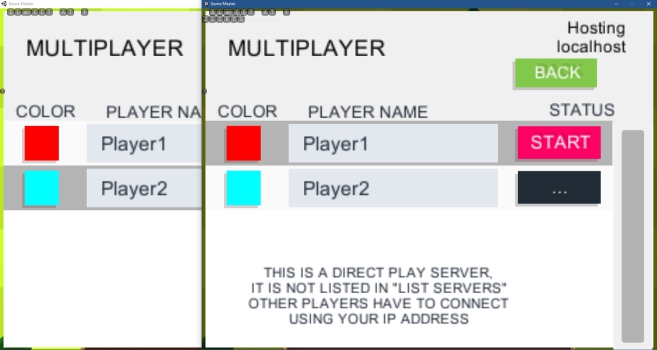
Multiplayer lobby on PC
Since it is no longer common to enter IP addresses manually today, you want to offer the user an automated game search. By that I mean to give a game or lobby room a name and then the user can select from a list of games or search for that name. To realize this, however, another computer is needed – a server that stands somewhere and manages this list. In other words, further effort and additional costs. As already mentioned, Unity offers a paid service for this purpose. This one then takes the work and costs for an own server system. On the 3DS, we limit ourselves as I said first on local multiplayer via WiFi. In theory, it can be implemented in the same way here because the big difference only takes place on a lower level. Currently, however, there are only very minimalist GUI buttons without great design or comfort, so it’s not worth mentioning.
Communication between the devices
After participants have found each other, they must communicate constantly with each other. The host acts as an intermediary between all other players who have no direct contact with each other. This already starts in the lobby – when a third player joins, the host tells him about the second player and the second one about the newcomer. Once the game has started and each participant has his own character that he can control, the communication is extended to the states of these characters. Each player must therefore send the current position to the host and this will be distributed to the other participants, if any. In addition, one also wants to see in which direction a player looks and whether he is walking or standing. Most importantly, one must remember that sending this information takes time, especially because not all players communicate directly with each other. This delivery time (latency = delay time, see also Ping) depends on many factors and can vary greatly. This and the temporal density of the information means that players seem to jump from one point to the next. Therefore, the player movements have to be interpolated. This means that each PC or device should try to predict the movements of all non-local participants to avoid jerky behaviour. In our case, this is even relatively easy since it is sufficient to transmit movement direction and movement speed. The deviations are so minimal that a player can not perceive this if the ping is not too high. From the movement information we can then derive the line of sight and the walking animation.
With the Unity variant, this can be achieved very easily. Objects for which this functionality is to be implemented, such as the characters of the players, only need corresponding prefabricated components. So our player gets a „Network Identity“, which says that it is an object that needs to be synchronized with other network participants. This identity is assigned to a network connection so that appropriate players can control it. In addition there is a „Network Transform“ script, which synchronizes transformations of this object. This script can be used to set how often and with what granularity which information should be adapted. In our case, this would be the movement, consisting of direction and speed, and the rotation of the object.
For the 3DS variant we have to manage this manually. To do this, we read out the values mentioned in certain time periods and encode them in bytes. This means that we use mathematical functions to map the values of our movements and rotations to natural numbers greater than zero which do not exceed a certain maximum. Of course, some accuracy is lost because we can not represent arbitrary complex numbers. These bytes are then forwarded in packets via the corresponding connections. On the other hand, these are decoded again and mapped back to the desired number ranges.

An old 3DS XL and a New 3DS XL are connected for playing.
Preview
Just from this article, you can’t really tell the required effort and complexity to solve problems and difficulties. But that’s exactly how it should be in the context of this developer’s diary. In any case, I have needed some time for these tasks and I can not spend too much time without working on the actual content. Currently I can do a lot more than is described here. You can already see something in the screenshot above – there is a chat system through which you can use to exchange texts and even smileys. A sent smiley also briefly appears a little bit larger above the head of the sender. It should reflect the current emotion of the user. Another feature is that you can see which minigame another player is currently in. If someone is busy with a game, everyone else sees the game’s icon above their head. Meanwhile, while standing next to this player, others can use the action button to get more detailed information. At this point it should then be possible to join this minigame if it offers such a function. But for this to be possible, there is still a lot that needs to be done. Of course, our first minigame „Gong“ is a great example for up to three other players to join us. However, minigames also need a kind of small lobby and several adjustments. With “Gong”, the paddles have to be assigned to the participants. In multiplayer, the experience system and the achievements must be handled differently. You can not easily award experience points to somebody who plays against another person because this could easily be used for cheating.
That should have been enough for network multiplayer for now. In the next diary entry, we will get to some artificial companionship but I would not like to reveal more about that yet. See you next time!
Do you prefer to read this diary in the developer’s mother tongue? Then click here to read this diary entry in the original German language! ##neue_seite##
##titel: Part 13: Companion Pet## Part 13: Companion Pet
Today we want to make sure that our player does not feel so lonely. To accomplish this, we create a retro companion. Today’s youth may not even be familiar with it anymore but we’re going to implement a variant of the virtual pet Tamagotchi, which was released in 1996 by Bandai.
Implementation of a „Tamagotchi“
First, we need a new item for our inventory. If you click on this Tamagotchi item, a larger version of it will appear. A nice touch: Even when the large view of the Tamagotchi is not open, the display of the virtual device is even completely visible in the inventory – the small number of pixels actually is enough for this. However, to be able to see and use it better, the larger view is essential.
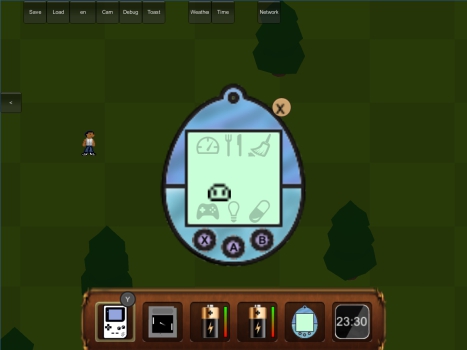
The Tamagotchi GUI
Like the original, our variant has three buttons. These can be clicked directly on the screen with the finger, stylus or mouse, depending on the platform. As you can see on the screenshot above, the buttons also are associated with gamepad buttons. In this case, it is X, A, and B that would correspond to the layout on an Xbox Controller which is the most commonly used controller on the PC. If the game were to run on a 3DS or the Nintendo Switch, the letters Y, B and A would be displayed here. The functions of the buttons also correspond to those of the original – the left to select the various options, the middle to confirm the selection, and the right to cancel an operation, or to jump back in the menu.
The needs of a pet
Like a real pet, such a virtual companion has needs. It requires food, sleep, caring in the form of gaming together, occasional medical help and it needs to be cleaned up behind it. The following screenshot shows the available menu items and the various interactions.
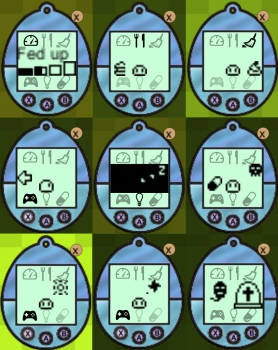
The different interactions
The following can be seen, from left to right and top to bottom: The status menu, where you can see the age, hunger and happiness. The food menu in which the Tamagotchi can be fed. The cleaning symbol that can be used to remove droppings. A gamepad icon that can be used to start a mini game. A light switch that turns the light on and off. Medicine with which you cure a sick Tamagotchi. A happy Tamagotchi after winning a game. A sad Tamagotchi after losing a game. A deceased Tamagotchi.
They grow up so fast
All in line with the development principle of GameMaster, virtual pets continue to evolve. The original contains a kind of family or decision tree – depending on how you treat your pet it evolves in a certain direction. Feeding it too much may make it get fat and sluggish. Some Tamagotchi implementations also offer disciplining. This should be used if the little one does not behave properly, for example when refusing healthy food. Letting pass too much of it will have a negative effect on its „personality“ – even if it is recognizable mainly or only in its appearance. For example, it may come to the point where our charge takes on a devilish form.
For now I postponed such pet development and have not yet implemented it. Theoretically, the effort would be relatively low compared to the rest since it is almost just about adding new graphics. One would also have to program the appropriate decision trees which govern when and how it evolves. I think it would be better to make that decision later because depending on the progress of the whole game, diverging concepts might be better. For example, you might need to upgrade the Tamagotchi device for further development. Or you can push it so far that it can leave the device and follow its owner on foot.
That’s enough to counteract the loneliness in this virtual world for now. Next time, we will cover new control options. For example, we want to ensure that our game can be operated on devices that only offer touch controls. See you!
Do you prefer to read this diary in the developer’s mother tongue? Then click here to read this diary entry in the original German language! ##neue_seite##
##titel: Part 14: Support for Android and iOS## Part 14: Support for Android and iOS
Today we want to make sure that our game will work on mobile devices. More specifically, it’s about devices which offer only touch controls. Most people now may think of their mobile phone or tablet, most of which are running Android or iOS, so I chose today’s title because of this. In general, this also applies to Windows Phone or devices that can be operated at least optionally without buttons and controllers, such as laptops with touchscreens or even the Nintendo Switch.
Control without buttons
Most phones, smartphones and tablets have no buttons to control our character, so we need a solution that allows us to control everything via touch screen. First and foremost, the controls get optimized for the 3DS and the Nintendo Switch which both have analog sticks (joysticks) and buttons. Exceptions so far only are a few menus such as the network lobby – which later will get additional button controls, too. For the 3DS, a pure touchscreen control setup is theoretically possible but at least for the Switch, it would not make sense in TV mode.
The most important aspect is moving our character through the landscape. For this, various approaches would be conceivable: For example, you could tap on a spot the player will automatically walk to and you could interact with objects by tapping them. For this, however, a pathfinding system would be necessary so that you do not get stuck on any small obstacle which would otherwise negatively affect the flow of the game. And all mini-games also would have to be adapted for other controls. For example, our “Gong” (Pong clone) could move the paddle to the finger. Such an implementation could make the operation more convenient for a user but would require a great deal of effort. It can also greatly change the experience and make things easier or harder. Imagine an online shooter, where a player with a mouse plays against one with a touchscreen – probably not fair. For these reasons, I decided, at least initially, for a „touch gamepad“ – the mapping of an analog stick and buttons on the screen.
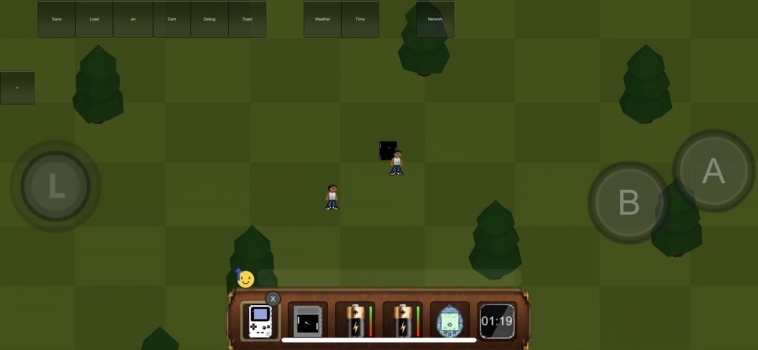
”Touch Gamepad” simulates gamepad buttons on the touch screen (iPhone X)
On the left side, we have an analog stick with which we want to move our character. Like his physical role model, you can either move it a lot or just a little bit in one direction to regulate the speed. So far we have an A and a B button on the right side. They simulate pressing, holding and releasing real buttons.
Initially, I experimented with a few peculiarities such a simulated analog stick can have as an advantage over the real deal. For example, it does not have to stay in place and could be moved a bit to accommodate the most comfortable thumb position. Or it can jump directly to the point where you place a finger so that you can start moving from any point. Of course, it should be noted that the analog stick can not be moved to positions where it obscures other UI elements that you want to interact with – neither the A and B buttons, nor the hotbar of the inventory should be covered. Unfortunately, I was not satisfied with the results of these experiments with different screen sizes and found it rather unpleasant not to be able to rely on a fixed position, so I have decided against these approaches for the time being.
Inventory navigation via gamepad
While you couldn’t move around the player character before without using buttons, it was the exact other way around in regards to the inventory menus. It was not possible to use or move the items without resorting to a mouse, stylus or touch controls. This should be changed to allow for button or general gamepad controls which is especially important for the Nintendo Switch’s TV mode. Here, too, a concept had to be worked out first to make interactions as simple and intuitive as possible. I wanted to make sure you can do as much as possible without interrupting the flow of the game. This means I do not want to pause the game, open an extra UI and go through all the items manually if it can be avoided. For example, how can you move an item from one inventory, like the GameGuy window, to the hotbar and vice versa? You can find lots of games where you can send each item individually to another inventory via additional submenu – „armor“, „equip sword“, „move potion to quick menu“, „put apple in backpack“…

Quick use and moving items via gamepad
In this screenshot you can see how I simplified such processes. With the L and R shoulder buttons you can move the item slot selection in the hotbar to the left or to the right. If a usable item is highlighted, the „use“ button is displayed, in this case the Y button as it’s the case of an Xbox controller. If this key is pressed, for example, the corresponding window opens when the GameGuy Item is highlighted. Now that a window covers the game world, it makes no sense to be able to move the player in the background. Therefore, the movement keys (analog stick or D-pad) now can be used to navigate in the inventory of the window parallel to the hotbar navigation. On the right side you can see what happens when a battery is highlighted in the hotbar while in the window a slot for the battery is marked. As soon as two slots are marked whose contents can be exchanged, the „swap“ button appears, here X. Without illustrating all the details, it should make clear how much easier the navigation will be. Of course, a lot of logic is needed to check which items can be used or exchanged.
These are likely to be the most important improvements in terms of controls which were fundamentally changed, meaning today’s topic has been dealt with. In the next diary entry, we will finally take care of a second mini-game and this time you are welcome to try something for yourself.
Do you prefer to read this diary in the developer’s mother tongue? Then click here to read this diary entry in the original German language! ##neue_seite##
##titel:Part 15: Pairs – Find matching cards## Part 15: Pairs – Find matching cards
Today we make an exception and implement a new little game independent of GameMaster which we will build into our main game later. It is a ”Pairs” (or “Concentration”) variant, where you have to find pairs of cards. In Germany, this kind of game is mainly known under the name Memory which, belongs to the German company Ravensburger. The player has a set of face-down cards in front of themselves with each of the cards is presented twice. They flip two cards over per turn, hoping to find a matching pair. If it is a pair, the player gets one point and the cards can either be removed or left face-up and the player is allowed to choose two more cards. Should they have picked different cards, they are turned back again and the move is over. Now the next player can choose two cards – so any number of players is possible. If all pairs are found, the game is over and the player with the most found pairs has won. So the challenge in this game is to memorize the cards and their positions in order to find them later.
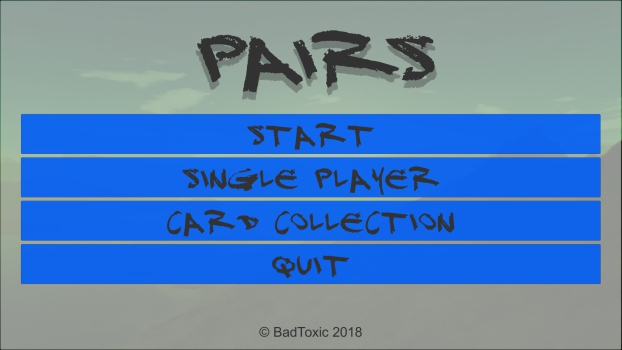
Title screen of the game
Motivation for independent game
Since GameMaster is an enormously extensive project which will take a lot of time to complete, it would be nice to produce something that can be completed quickly and presented in the meantime. But I had two more reasons: First, I wanted to give a friend a simple introduction to Unity. Second, this game with its pictures on the cards makes a perfect gift. For this stand-alone version, I use photos from my recent holidays in Indonesia and Singapore over Christmas 2017 and New Year’s Eve 2018. For the GameMaster version of this game, however, I will have to use different pictures as these photos take up much space even in a strongly compressed state and don’t quite fit into the context.
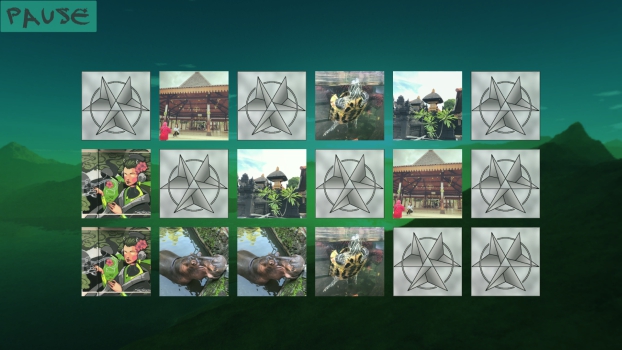
A few found pairs
The implementation
The key part of the mini game is the cards. These have two different sides and can be turned over by clicking or tapping. For this purpose, Unity offers two-dimensional surfaces such as „plains“ or „quads“ which can be covered with a texture. Clicking activates an animation that rotates the card 180° in within a certain period of time instead of turning it around abruptly. In addition, we need a controller object that manages everything. It lets only two cards be turned over at once, points are awarded for found pairs and other cards are turned back. Of course, the controller also has to manage much more. It initially creates the pairs of cards and puts them on a square grid in random order. It also visualizes switching the player turn and displays the scores. A little extra feature is collecting cards. There are about 150 different cards randomly selected. Each card that was once found as pair is listed in the „Collection“ menu, along with the number of cards found so far and the total number of cards. Here, the pictures can be viewed in peace. Also after a pair was found, the image of the cards gets zoomed in until the user closes this view.

The collection with all found images
The pictures
The pictures also need to be prepared for the game. First, they should be square but the size and quality play an important role, as well. Actually, at the beginning I spent a lot of time trying out moving pictures in the form of gifs or videos. However, I came across several problems that I would not like to explain in more detail here, especially if you want this to work on all platforms. Therefore, I decided to limit myself to normal photos. I have cropped all these photos manually because I wanted to make sure that the respective section is optimally chosen. Since I did not know how many pictures it would take in total and how much storage they would occupy compressed when I started out, I decided to put each photo in two resolutions (256×256 and 512×512) instead of having to do the work twice if necessary. I had even considered building two different variants with these different resolutions, but ultimately decided on the 512×512 pixels.
But with all the pictures I faced a new problem: The game would take a long time to load to prepare the textures. To counteract this problem, the photos are stored in an extra resource folder and are only loaded asynchronous at runtime. In other words, the game can already be started before the pictures are even ready to be displayed. Accordingly, the cards and elements in the collection only have a white surface until the respective photo has finished loading. In practice, however, this is done so quickly that the textures are already done before the cards are laid out or the collection has been opened, but this has a very positive effect on the entire loading time of the game.
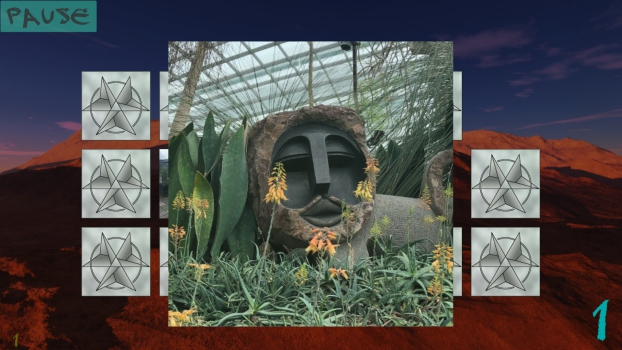
Zoomed-in image from Singapore
Multiplayer
As already mentioned, you can play “Pairs” with theoretically any number of people. For this version I also offer a two-player mode in addition to the single player. You can choose between three AI levels and a local human player. For the GameMaster version, however, I have four players planned, similar to our pioneer minigame “Gong”. The AIs are relatively simple. The weakest of them always chooses two cards at absolute random. The other two remember which cards have already been revealed and are trying to uncover pairs. If their turn begins, they first check whether a pair is already among the previously visible and reveal it. If not, they choose a random card from those that were not visible yet and uncover it. If its partner card was already visible, this one will be taken. Otherwise, another random one that was not yet visible. This means that they play perfectly from the point of view of an human but do not have information reserved for humans. In order to weaken one of the two AIs, I let them choose a wrong card with a certain probability, even if they already know the correct one – just like a person who has forgotten the exact position of one of the already visible cards.
You can take a look at the result yourself if you want. The game is available for free and without ads: For iOS, in the App Store. And for Android, in the Google Play Store and on Amazon. Until next time!
Do you prefer to read this diary in the developer’s mother tongue? Then click here to read this diary entry in the original German language!##neue_seite##
##titel: Part 16: Integrating Pairs into GameMaster##Part 16: Integrating Pairs into GameMaster
Last time, we implemented a new game where you have to find pairs of cards. We built it as an independent project and published it as a separate game. Now we want to add this to our GameMaster project as a second mini game. Unfortunately, it is not enough to copy all files into the target project – there are a lot of necessary adjustments to be done and of course we want more new features.
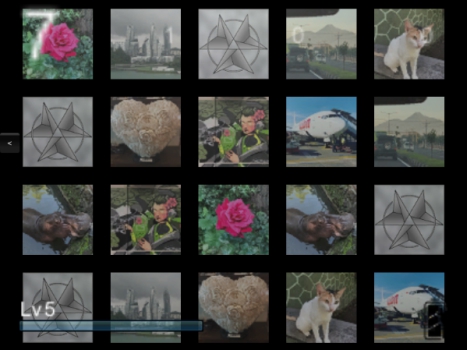
Local game with four players and 20 cards
The necessary adjustments
Luckily we have planned to integrate the new game into our project from the beginning and built it up accordingly. There is a controller object that is needed for all logic as well as a player object. These two can inherit from the corresponding equivalents in GameMaster and thereby automatically take over a number of required properties, making it possible to start and end the game from the outside, for example. Other objects such as the play card can be adopted with almost no change while the inheriting still need some adjustments.
Like our previous mini game „Gong“ we want to allow up to four players, both locally and in network games, instead of the two players from the previous stand-alone game. We also want to add the ability to level up and develop the game which is the basic feature of a mini game in our project. We therefore have to determine which actions yield how many experience points and what functions you can unlock with it. Only a local human player should get experience when competing against CPU players. The higher the level of difficulty, the more points you should receive. Each found pair should give a small amount and winning much more. It would also be nice if you could get experience in a game against humans but it would also make it very easy to cheat. In order to prevent a player from deliberately losing to give the other more experience, he should lose experience in return. But even then, the other player could simply reload his save game after his experience has dropped. To counteract this, one would have to manage the save game for an online game on the server which unfortunately I can not currently offer. In addition, this would be impossible in local offline games.
Developing new options
In order to turn the earned experience into improvements, „Pairs“ also needs a skill tree. This is implemented similar to that of „Gong“. You have the opportunity to „learn“ the difficulty levels and a higher number of players. Great for this type of game is the ability to have nicer cards – such as pictures instead of patterns – and a higher number of cards to uncover which should lead to a higher experience payout. From that, different types of cards must be drawn or created and the number of cards must be changeable. For a long time I was not sure if such learnable options, for example the higher number of cards, should be adjustable or mandatory when learned. In the end, I have implemented an additional options menu for such things, which can be found in the main menu of a mini game once you have access to at least one option. However, this is not very user-friendly and I thought about including this in the menu where you can choose the number of players. Then again, this player menu already uses up all the space on the screen on a 3DS which is why another solution would be necessary – multiple tabs or scrolling. Another alternative would be the ability to activate and deactivate the skill directly in the skill tree. While this would be intuitive and compact, it would still require some sort of navigation to this menu that is otherwise unnecessary. In the end, as I said, I implemented the variant with the options menu in which two settings can already be found, provided that you have learned them. In addition to the option of selecting a card set from the initially available patterns and photos, you can increase the number of cards from 12 to 20.
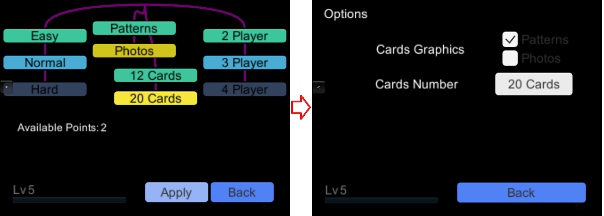
Develop options to use more graphics and more cards at once
„Pairs“ offers a card collection – a menu item under which you can see which cards you have already revealed as a pair. This had to be incorporated into the menu structure of our mini games in a way that can easily be reused by other games. Previously, these collected cards were stored in a text file and loaded from there. In order to comply with our GameMaster saving principle, this has been completely replaced. Only one bitmap is saved, that is a single number in binary notation that assigns a one for each collected card and otherwise a zero. The image files of the cards all end with a number (such as card0.png to card42.png) which can be uniquely assigned to the positions of these bits. Instead of a text file with up to 42 lines of text, this results in a number with a maximum of 42 digits (binary). This of course saves space and is also stored and loaded faster.
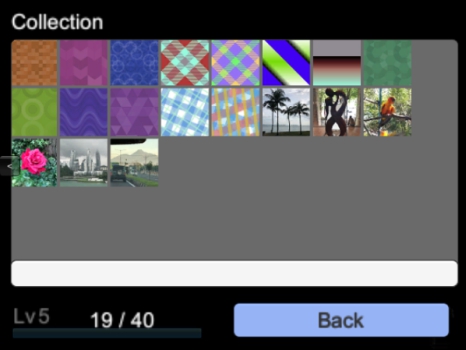
A few of the patterns and photos that can be collected
Always the biggest problem – network games
The biggest challenge is once again the network mode. Up to this point, we just synced players‘ positions and orientations, something that does not really help us with a card game. Instead there are completely new commands that are probably not suitable for reuse in other games. The host of the network game sends all participants unique identification numbers of the covered cards in the order in which they are created. So you can make sure that all players play with the same cards. In addition, it must be ensured that only the player of the current move can turn over cards that. We can take over how the points are counted from Gong. For the existing functions it doesn’t matter whether it’s about „scored goals“ or revealed matching cards.
Of course this diary entry only scratched the surface of the tasks and problems again but this should suffice for an impression. Next time, we will look at „statistics“ – remembering various values such as the playing time or number of games won, why it is needed and what it can be useful for. Until next time!
Do you prefer to read this diary in the developer’s mother tongue? Then click here to read this diary entry in the original German language! ##neue_seite## ##abschnitt:2019##
##titel:Part 17: Statistics## Part 17: Statistics
Today we are going to focus on the numbers, but do not worry, it will not be very mathematical. It’s time to memorize all sorts of data so we can evaluate it for different things later. The focus here will be put on the achievements because these often do not depend on just one special event but need a certain number of one or more events. In addition, numbers can give more expression to the player’s efforts, so we want to show him the collected statistics directly.
Skill must be rewarded
Achievements should serve as an incentive to play games more often or longer and not just to have the main goal in mind. Just like with a trophy collection, taking pride in your accomplishments you can boast with as well as the urge to collect play an important part. But if I get an award for having scored 100 points, these must also be counted, of course. And when I start the game again it should not have to count again from the beginning, so these numbers must be included in the save game.
As always, we want to benefit from reusability. That’s why we initially define a few actions that we want to count in each minigame:
1. How many times has the mini game been opened? (e.g. turned on the GameGuy)? (n)
2. How long has the game been open? (t)
3. How long has the game been played (not paused, not in the menus)? (t)
4. How many games were played? (n)
5. How many games have been won? (n)
6. Achieved points (across all games)? (n)
To do that, I’ve noted down what kind of number it is so we know what type of data we can store. (n) for a natural number and (t) for a time in seconds or milliseconds. So we create a list of numbers that are incremented by the corresponding actions. These must then be written regularly in the save game and read again at the next start. Currently our score can only be saved or loaded manually by clicking on a button. Should GameMaster support automatic saving later, you still have to consider how often this data should actually be written. Since such processes take some time, writing changes after every little adjustment is completely out of the question. Instead, it shoudl happen after certain intervals or following certain actions.
These general statistics are joined by those that depend on the respective mini game. For example, for our card game Pairs from the last diary entry, the number of revealed card pairs is a good idea. The „points“ mentioned above can be used for something different for each game. In this case, it would be the number of matched pairs of cards. In Gong, it’s the amount of „goals shot“. Then we can create the new achievements, including pictures and short descriptions. For example, with Pairs we can give out an achievement for the first pair found but also count and give out another for the first 100 found pairs.
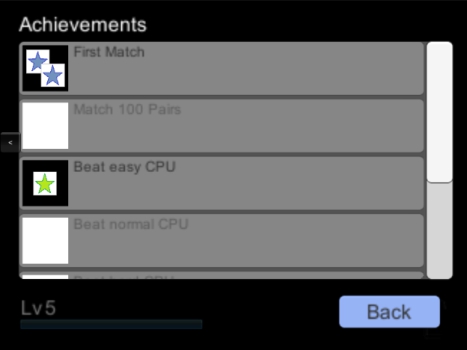
Two of the achievements of Pairs have been unlocked
Easy on the eye
As previously stated, we want the player to be able to see all the statistics themselves. For this purpose, a new menu sub-item was created again. However, this time it is a small button with a diagram icon to the right of the previous buttons in order to make it look less overwhelming. Besides, you probably check this one less often than the other sub-menus. On the statistics page we will find the numbers with short descriptions. So you can always check how much more you need of something to get certain achievements, provided you know what you need which you can tell from the yet-to-unlock achievements. In order to make everything look a bit more impressive, I wanted to offer diagrams. So I have allowed myself to implement a pie chart first. Of course, related values lend themselves much better for such a chart, such as the number of games played and the number of games won. At this point it should be mentioned that I deliberately decided not to record the number of lost games. We do not want to remind a player how bad they once were. 😉 On that note, I should point out that games which weren’t won don’t necessarily translate to lost games. They may have resulted in a draw or the player just intentionally quit out of them. Negative tallies like that also usually provoke the player to quit the game when they see they can’t win anymore, lest they get permanently etched into their statistics. This would be inappropriate, especially in multiplayer games.

Labeled pie chart
Easy as pie
The pie chart was actually the only, albeit minor, mathematical challenge here. But I also wanted to try out if I could just do it. Fortunately, our Unity 3D development environment already provides the ability to circularly „fill in“ displayed images. There are several fill functions that are meant for things like life or progress bars. This also includes this circle section variant – only a percentage (0 to 1) must be specified. All that remains to be done is to calculate the percentages of each portion and to rotate the circular cutouts so that they form a full circle. To illustrate this with the screenshot above, we won two out of three games. So there is a section with 33.3% and one with 66.6%. The second section must then be rotated by the percentage of 360° of the first. If the red is 33.3%, the second one has to be turned by 33.3% (one third) of 360°, ie 120°. A third section would then have to be rotated by the proportions of the first two and so on. Quite a bit more complicated is the calculation of the positions and orientations of the small captions, which can also be seen in the screenshot. But I do not want to bore you with more calculations.
That’s it for today. It will be fishy the next time – the third mini game is coming up. See you!
Do you prefer to read this diary in the developer’s mother tongue? Then click here to read this diary entry in the original German language!##neue_seite##
##titel: Part 18: Fizhy##Part 18: Fizhy
It’s time for a new game! Let’s tackle the third mini game! It’s a remake of the first game I’ve released to the public in the app stores of Apple and Google – Fizhy. It is a puzzle game based on the principle of the Nintendo classic Dr. Mario. You can also try the old version yourself before you read more about it and get it for free and ad-free for iOS and Android.
Description
Instead of explaining the exact functionality of the game, I allow myself to quote the description from the app stores:
Catch all the fish in the pond located in an idyllic mountain landscape by putting together chains of at least four same-colored fish or bait parts, either horizontally or vertically.
The baits are thrown into the middle of the pond and slowly sink down.
They can be moved right, left or down and be rotated in 90° intervals.
Once a chain of at least four parts is built, all involved fish are biting and reeled in.
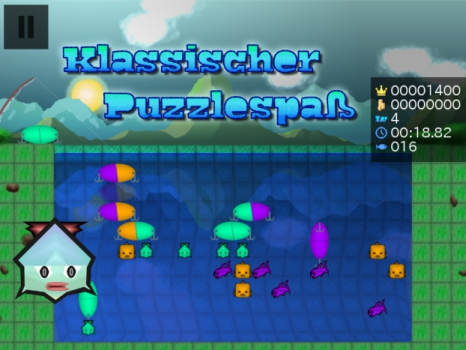
Compete with others by trying to claim a bigger high score. Creating several chains in the same move awards more points.
Unlock increasingly harder levels and visit three worlds with different difficulties, each featuring a unique environment with 20 levels. (Or are there even more?)
Can you unlock all the achievements?
Or even make it to the top of the highscore list (leaderboard), by gaining the most points?
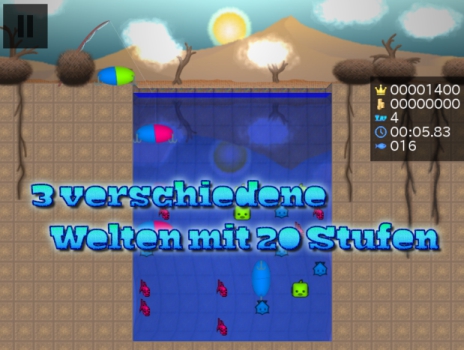
Swipe your finger across the screen to move the baits. Alternatively, you can use a gamepad that is compatible with your device.
A special feature of this game is the optional stereoscopic view, which allows you the play the game in 3D.
For this to work you have to either connect your device to a 3D TV, put it in a VR glasses holder or just squint.
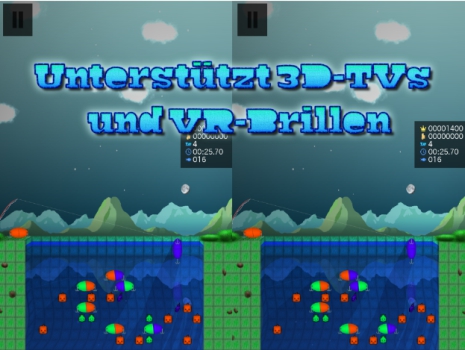
The game offers a variety of settings, which allows you to optimize for graphic quality or speed,
disable the groovy background music, to use another language or to activate the color blindness mode, which maximizes the difference in color intensity in order to compensate for visual impairments.
The new edition
As with our second mini game, we’re also developing this as a stand-alone project before integrating it into GameMaster. Unfortunately, since we’re working with the Unity 3D development environment and the old game was implemented with GameMaker, we’ll have to do it all from scratch. Also the “GameMaker Language” (gml) scripting language used in GameMaker is very different from C#, making it difficult to reuse individual codes. Above all, the graphics should be greatly improved and raised to true 3D. For this I have selected a setting to my liking: A Japanese zen garden. In fact, the graphics are the biggest challenge in this mini project and should enable me to learn new things in this field, which will help me later in the main project.
The implementation is almost trivial compared to the effort I spend on designing the world, especially if you’ve already programmed everything before. One after the other, baits are thrown into the water which fall down a field at the same time intervals. So we need a timer that keeps some code running by calling it again after a fixed number of milliseconds. Here it is especially important to use the real elapsed time and not to count the number of cycles of the main code. For example, we set the frames per second (FPS) to 60 and could therefore assume that after a run, or after a frame, 1/60 seconds have passed. However, this is the ideal case, which rarely corresponds to reality. As the bait falls, it can be moved left, right and down, or rotated 90° clockwise or counterclockwise. Turning is a bit of a hassle as we can not rotate the bait object around a certain point without it sticking out of the grid. Every rotation requires a translation.
It is not rotated around a certain point.
In fact, I made it so that it can only rotate between 90° back and forth and the other orientations (180° and 270°) are realized by swapping the two parts of the bait. This makes it easier for me to manage the references between all the bait (sub)objects later. Finally, if a bait can not continue falling because it has landed on the ground, on another bait or on a fish, all bait and fish on the field will be checked for chains of objects of the same color. At least four objects must be connected horizontally or vertically without interruption so that they can be „cleared“. The affected objects are then marked and successively dissolved, or fish pulled ashore in further time steps. It must be noted that an object can be part of a horizontal and vertical connection, so theoretically it would be cleared twice. By catching several fish in succession without throwing in a new bait, combos are created that give more points. After each catch, the score gets doubled. Furthermore, it must be noted that after clearing or catching, other bait parts may no longer rest and fall again. Thus, new combos can be created again before another bait can be thrown. If this chain reaction is completed, it is checked whether all fish were caught – if so, the level is done. If there is no room left where the bait is dropped, the game is lost.
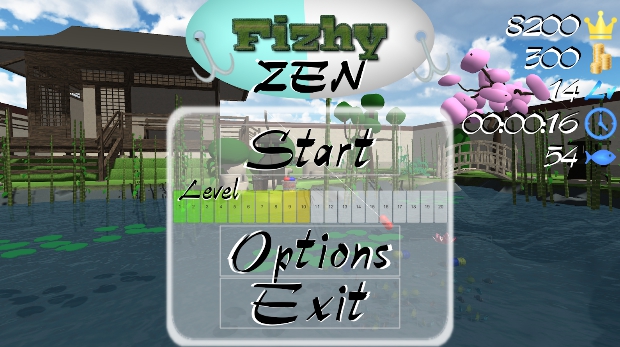
The title screen
The spatial world
Creating a three-dimensional environment is much more complex than drawing the backgrounds for the old version of Fizhy. Only by modeling objects one could fill many diary entries. In fact, I use the modeling software Blender to fix something. However, I have neither the time nor the experience to create everything myself within an acceptable time frame and with a suitable level of quality. That’s why I’m looking for a variety of resources, free-for-commercial-use 3D objects and textures. This way I can gradually search for all relevant components as they are to be seen in the result. Fortunately, I quickly stumble upon a Japanese garden, which was already well done: Japanese teahouse with garden free 3D model. However, no textures are included here and there is enormous disorder in the hierarchy of the many thousands of objects. So I invest a lot of time to sort the objects meaningfully so that they can also be influenced hierarchically. For example, leaves should be subordinate to their branches and these to their tree trunk. I set the object groups to be enabled and disabled for different graphic detail levels. These levels can be set in the options of the game.
Graphic details can be adjusted in the options
For many objects, I completely forgo textures and assign monochrome materials to them only. This of course saves space, is easier to render and gives the game a special comic-like touch. Even though the garden is starting to take shape, it still looks static and thus unrealistic. That’s why I decide to put some wind into it and deal with this topic for the first time. Finally, it boils down to make all trees and shrubs completely new as „Unity Trees“, which can be efficiently affected by wind. For the first time, I streamed a bit of development for this topic on twitch (see the Unity3D Collection on my Twitch Account xybadtoxic). Don’t be surprised if the video is no longer available at the time of the release of this diary entry, videos will be automatically removed after a while. But if there is any interest in it, I could do it more often. In the video you can see the different steps that are necessary to create trees. That’s why I will not write it down in detail. With a skybox I bring more movement to the world – a sky in the background, which moves slowly.
There is so much more…
There is a lot more hidden work in the finished game, but these should have been the most-important topics. On top of that, there are the touch controls with their swipe gestures which have to be perfectly balanced. Relevant are the distance a finger has to travel before a bait moves and above all the time intervals between the individual movements. A UI (User Interface) must be designed, the points counted and stored along with other data, such as the leveling progress. Another challenge was to match the field and the camera so that the space could be used perfectly on an arbitrarily large screen. Especially the formats of the screens are very different today. Tablets are almost square while current smartphones like the iPhone X have an extra-wide screen. The UI has to scale accordingly, since with new devices, the pixel density is so high that individual buttons would otherwise be too tiny. Then there is the creation of the store entries for Google Play and iTunes with a lot of text and information in possibly several languages as well as taking many screenshots and other images in all sizes and formats. Also, there are always platform-specific complications that have to be overcome. All in all, I’ve spent over 100 hours of work on this game, as I can tell from my time tracking application. An amount effort I will not invest into every mini game. But I was also able to learn a lot of new things and for some „fans“ of my Fizhy game, I liked to invest a bit more time.
And with that, I want to say goodbye for this entry. The new game Fizhy Zen can also be found on Android and iOS to see for yourself. And it will be no small feat to implement this game into GameMaster. See you next time!
Do you prefer to read this diary in the developer’s mother tongue? Then click here to read this diary entry in the original German language! ##neue_seite##
##titel:Part 19: Porting Fizhy over to GameMaster & AI## Part 19: Porting Fizhy over to GameMaster & AI
Last time, we completed the new mini game Fizhy Zen, which is available in the Google Play Store for Android and Apple App Store for iOS as a standalone game. Today we want to port it over to our main project GameMaster as a third mini game.
The usual tasks when porting
This time I created a kind of tutorial for the steps that are always needed when I want to add a new game. I hope to be able to further optimize the process to be done with it even faster in the future. After copying the files from the Fizhy project to the GameMaster project, there is much to do. I’m introducing a new game cartridge to start Fizhy via GameGuy as well as a quick start reference to shorten the process of testing the mini game. Hard coded texts must now be moved out to the translation files to read them from there. References have to be distributed to different objects so that they can find the corresponding information. For example, the GameGuy console needs to know which object to instantiate in order to start the game. All in all, a lot of small tasks that aren’t a lot of fun. A large portion of it is necessary before the new game can even be started. Additional tasks such as creating a skill tree, achievements and options, or enabling savegames and (online) multiplayer should only be considered once the game has been successfully integrated.
Unfortunately, I did not think ahead enough in one point. Fizhy Zen is not designed for the kind of multiplayer I would like to implement. The problem is the structure of the objects: playing area, fish, baits, fishing rod, etc. are not subordinate to the player, but to the game itself. In other words, it is not possible to have one playing field per player without major restructuring in the code. An easier solution would be to implement a kind of co-op game in which two players at the same time fishing on one pitch but that’s not the way I imagined this and thus I have to bite the bullet and do much refactoring.
An artificial intelligence
Compared to the two existing mini games, AI is a huge challenge in this game. Rarely do I fall back directly on theoretical knowledge I acquired at University but here I lack practical experience. Terms like „backtracking“, „breadth-first search“ and „depth-first search“ as well as associated processes come to mind immediately. Perhaps the most exciting topic that I have faced with this project so far. However, there is a lot of planning and thinking to do before taking too many steps in the wrong direction. An ideal solution does not exist here, as long as one is subject to the usual natural constraints, such as limited storage and runtime. An AI could perfectly play with a database with optimal moves for every possible situation. I have to drop this option, however, because even if the storage needed would be less of a problem these days, I might need years to create something like that manually. It’s like with chess – you can not always try all the following moves to determine the best course of action. Usually a combination of a search algorithm and a database of important moves is used instead.
I’ll start by preparing a recursive search algorithm: A function that will test all reachable fields for each bait thrown in. In a given order, it tests each possible bait move in turn. You can tell whether it goes to the left or to the right first, i.e. along the breadth (Breadth-first search) or down in depth (Depth-first search). So the AI walks „paths“ in the game area. However, it doesn’t do that in the visible game area but in an internal data structure which is a representation of it. A test function will be performed on any field where a bait can lock because of a fish, other bait, or ground beneath it. This test is designed to determine how good or bad the position is and rates it with a score. Whenever the bait runs into a dead end, meaning it has no other direction to move to available, it goes back to the previous field and from there use the next remaining free direction. This is called backtracking, in this case recursive backtracking. Each field that has already been traversed is also marked so that you do not visit it again, starting from another field. At the end, the path that leads to the position with the highest score is selected. For each test, the current path is saved if it has outbid the highest score so far.
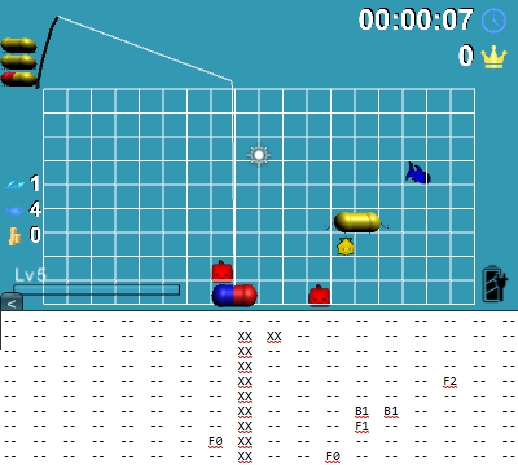
For reference I can print out the paths of the search while testing.
The evaluation function
So our search algorithm tries to evaluate different solutions without considering the consequences of their actions. A common approach would be to use the same points for evaluation the player would get. For Fizhy that would be the score for catching fish. It’s obvious this is not enough in this case – it usually takes a few moves in advance to catch fish. In addition, it is not always the best strategy to catch many fish as fast as possible because you could obstruct other fish. In addition, I have decided to observe the current turn only and not to calculate any following turns. After all, you can see the next three baits, so it would be fair. But first I want to avoid that too long computational processes could cause problems, especially on weaker devices.
So there it is, the biggest challenge in this project so far – the evaluation function for testing the positions. Starting from the position to be tested, we look for both bait parts in all four directions to see what bait and fish there are. Simply put, we want to count how many same-colored and different-colored objects are next to us and give more points for the same color and less or even negative for another color. But that is easier said than done. On the one hand, empty fields between the bait and the surrounding objects should play a role. They should influence the evaluation to the extent that the bait is placed closer to the relevant objects. So we weigh the points in proportion to the distance of the objects to the current field. On the other hand, objects of the same color behind a different-colored object should no longer, or not very much, contribute to the evaluation since they can not form a direct line with the bait. We also do not have to look endlessly in all directions, just to the edge of the game area or a certain distance. For example, four or more objects of the same color would dissolve immediately, so you only have to look in all directions up to a distance of three or four. A special case are objects above the current field: baits may already dissolve when stacking before the object is reached. In addition, care must be taken that there is enough room to accommodate other bait parts to complete the chain. Accordingly, one would also have to look in the opposite direction again, whether there are already same colored objects or there is still room. Of course, the other bait part must also be taken into consideration which at the time of the test is not yet part of the game area. In addition, you can easily block the throw-in area in the middle of the pond. Therefore, you should again give a negative rating depending on the distance to the point of entry.
As you can see, there are countless little special cases that make implementation difficult. And even if everything is considered, it takes a long time to experiment and observe the scores to find good values. Here are some basic example values:
Points for the same colored fish: 200
Points for the same colored bait: 30
Points for different colored fish: -150
Points for different colored bait: -40
Something can be resolved: 350
Not enough space to complete the chain: -50
Once all these things have been implemented, there are other special cases. For example, a fish that is high up and does not have enough space from above to be caught. As already mentioned, this can mean that it can not be reached from below because a similar colored stack would dissolve in advance. Therefore the rule is needed to prefer other colors in this case. For that to work you have to check more fields up than down or to the side. Another observation shows that it is difficult for the AI to get at obstructed fish if dissolving other bait parts in another location also gives as many points as clearing them around the fish. So again we need a rule that states parts close to fishes should be resolved preferentially. This topic in itself is already a complex problem. Strictly speaking, for each field you have to know how many fish there are and weigh them in relation to their distance. This value can then be added to the rating. However, it is not easy to find a good median so that the desired area is indeed preferred but not exclusively played.
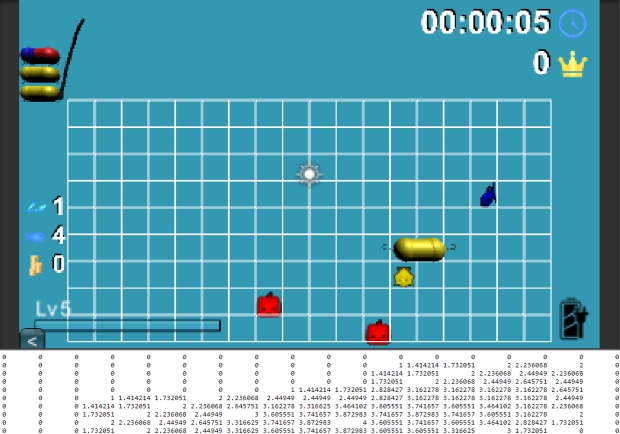
Here you can see the weights of the fields depending on their proximity to the fish.
The AI is still far from playing perfectly – but it does not have to, you still want to be able to win. However, I’m afraid that it does not play well enough to be a challenge for an advanced player. Nevertheless, I have to go forward and not spend too much time with it, even if I do not like leaving things unfinished.
Multiplayer
Since the AI development has already taken so much time, I postpone the implementation of online multiplayer for now. However, I still want to implement a local multiplayer right away. As mentioned at the beginning of this diary entry, this requires a major restructuring of the code. All instances belonging to a particular player must be subordinated to it rather than the game itself. Needless to say, the mechanics also have to be adjusted. For example, it must be decided when a game is over. If we have four players and one has finished his level, is the game over for everyone or can the others still fight for the second, third and fourth place? Another big change is that players can play different levels. So we need another menu before the start which allows this to be set for all players.
Each player can start in a different level.
In addition, depending on the number of players, the positions of the playing fields and the UI texts have to be adjusted. Especially if we want to support different screen sizes and aspect ratios, this can be a challenge. Not to mention that I still support the 3DS resolution and there is not much space on such a small screen.
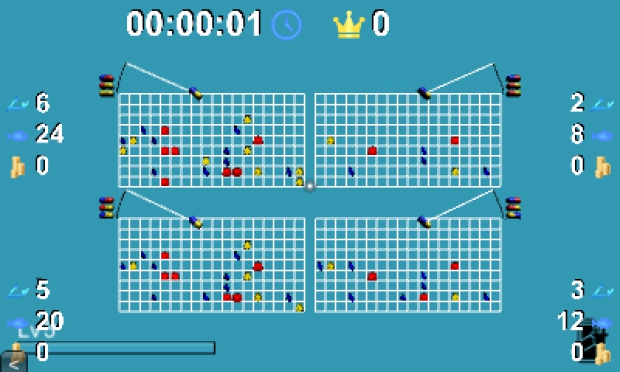
Four players on a 3DS screen – there is still much to optimize.
Skills and Achievements
Last but not least, I would like to briefly discuss the other topics mentioned above. Even Fizhy gets a skill tree. As usual, we offer learning different AI difficulty levels. Added to this is the graphical enhancement of 2D sprites to three-dimensional models and the already shown local multiplayer for up to four players.

These skills are offered so far.
Once the 3D fish are learned, they can be activated and deactivated in the options menu at any time. While I’m at it, I also implement several achievements. Partially I can reuse graphics from the old Fizhy version here. You can unlock these achievements by catching fish, dissolving lures, making combos, winning games and finally collecting all the achievements.
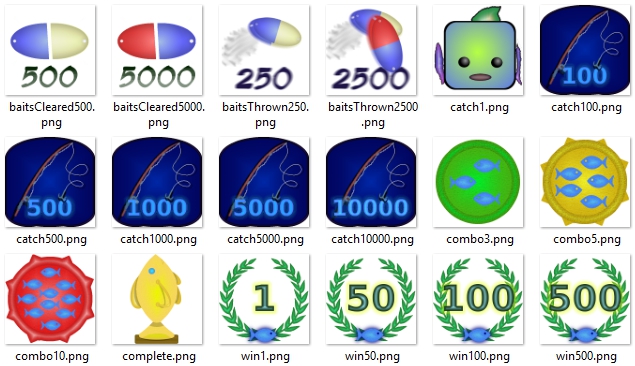
A few simple graphics for the Fizhy achievements
With that I would like to conclude today’s diary entry – that was a lot of text, after all. And yet I only manage to scratch the surface of the topics here and skip a lot of aspects. Next time, I want to talk about the community that should be behind such a project. It is essential in many ways. In addition to the society of like-minded people, further aspects are in the foreground, from pure information finding over support to marketing.
Do you prefer to read this diary in the developer’s mother tongue? Then click here to read this diary entry in the original German language!##neue_seite##
##titel:Part 20: Creating a Community## Part 20: Creating a Community
Now that we are done with Fizhy for the time being we will switch to a very different topic. Behind every known game stands a community. Be it on Facebook, Reddit, fan wikis or other social platforms. As soon as a game makes a name for itself, a community forms pretty much on its own. Sometimes there are also communities within the games themselves or on special websites provided by the developers. If you read about the process of game development, you often find building a community right at the beginning. It is said that one can never begin soon enough. Today we want to take a look at what such a community is good for and how to get started creating one.
Purpose of a community
There can be many reasons for the founding of a community. At the base level it serves as a society of like-minded people who are interested in the same thing and want to talk about it. Perhaps the most common reasons for joining a game community are questions you’ll want to find an answer to – „How do I beat that level?“ Often, whole fan wikis (encyclopaedias) are formed which are specialized to answer questions that have not even been asked. Another reason can be bragging or looking for criticism and opinions of others – „What do you think of my new equipment and stats?“ You may be looking for recognition and want to show what you have achieved. Or you want to improve, compare and learn from others. Essentially, you can list all the reasons for any kind of interpersonal conversation here. Of course, there can also be practical benefits which result specifically from features of the game. For example, you can arrange a guild raid or find someone to trade or exchange items with.
From the viewpoint of a publisher or developer, a community offers advantages, too. Often this provides a simpler way of being able to provide cost-effective and efficient support. Instead of having to reply to emails and calls, they can do so in a place where they can already refer to and fall back on a collective knowledge base. Frequently, help requests can already be answered by other users without having the team to intervene. Furthermore, a community provides extensive feedback. That way, the developers can react early and change something or find out what is good and in which direction they should continue. The possibly most important aspect, however, is the free advertising effect. To spread knowledge about and impressions of the game without high costs.
Spoilt for choice
But where to start? Which social platforms are good, what are the pros and cons? Should one be represented everywhere as possible or rather focus on one network? These questions are not easy to answer. On the one hand they depend on the game to be represented, and on the other hand on whether you can muster the energy to moderate all of them. You can focus on the above advantages first in order to make better decisions. To start, I want to create a one-stop-shop where people can contact me and get involved in the development process if they want. Facebook, Twitter et al. are better for spreading news and providing steady feedback in development. Above all, such platforms live from regularity and users jump off quickly if they do not get enough material. Instead I prefer a place where I can store all information persistently and in an easy-to-find manner. After a lot of research and experimentation, I decided to focus on Discord. “Discord is a proprietary freeware VoIP application and digital distribution platform designed for video gaming communities, that specializes in text, image, video and audio communication between users in a chat channel. Discord runs on Windows, macOS, Android, iOS, Linux, and in web browsers. As of 14 March 2019, there are over 250 million unique users of the software.” [Wikipedia]
One should differentiate whether the web presence presents the game, the company or the developer himself. So I have created a Discord server for my game GameMaster and another one for myself and my company. Nevertheless, I am represented as a person, developer or one-person business on a number of other platforms. I am currently putting a lot of work into my Instagram account where I mainly post news about my development with some occasional bits from my private life. On Twitter, on the other hand, I focus more on the development side, albeit in a more reserved manner. As a pure developer, I am also represented on Facebook. This covers a few of the largest social networks and prioritizes the content differently, just as I see fit for typical audiences on the respective platforms. I am also on many more platforms that I will not list. Most of them are primarily for discoverability and then refer back to others, such as Discord. Of course, I would be very happy if a reader finds their way into my communities and supports me.
Setting up Discord
Of course we need an account first which we can create on discordapp.com if not done already. As the Wikipedia description has already covered, we can do this directly in the browser but also in apps for different platforms. As soon as you are logged in, you can certainly create your own server by clicking on the plus in the server list on the left.
The button to add a new server directly below the GameMaster and BadToxic servers
Then you can create your own text and voice channels and invite the first users. But I would hardly write in the style of a manual if everything would be as trivial as these first steps. 😉 I’d better start with a critical topic right now – spam and protection against it. When you make a server publicly available, you are always in danger of people coming in with bad intentions and doing mischief. This can be expressed in various forms. Users can spread spam, advertisements or indecent comments in all channels. They can post links to harmful things or phishing attempts. They can also see all other users who are on the server in order to write (and annoy) them privately. One can also use bots to automate these attacks. This can lead to entire user groups going from server to server in order to spam them with countless messages for the fun of it, making the servers unbearable in the process. Of course, as an admin, you can block and kick those users, but that does not prevent those attackers from creating new accounts and starting from scratch or others coming and doing the same. It is difficult to do something against such things without heavily restricting the good users. But there are resources and I will explain them briefly.
Discord gatekeepers and roles
I’ve used various bots and roles to create a kind of „gatekeeper“ who should only let well-meaning people onto the server. This works as follows: there is a channel called „Welcome,“ which is the only one visible to anyone initially. There you have to perform a specific action before you get access to the other channels. In my case you have to „react“ to a text with a certain emoji. These so-called „reactions“ are a Discord function that allows you to place symbols directly underneath a post. You may already know this from Facebook if you are new to Discord. So I wrote down a small list of rules which you have to agree to with a check icon before the rest of the server is unlocked.
The welcome channel on the BadToxic server acts as a „bouncer“ (Gatekeeper)
The advantage of using this symbol is that you can completely disable writing in this welcome channel, meaning nobody can spam here either. Alternatively, you could set up the server in such a way that the user would have to write a certain text, e.g. „agree“. Then you could immediately have all messages there automatically deleted to avoid spam. But I chose the first option because I think it is cleaner and easier.
In order to implement this we need roles first. Each user can have different roles and for each channel you can set specific rules for each role. We forbid writing messages by everyone (“@everyone”) in the welcome channel, but create another “@Member” role that should be able to write in all designated channels.
The welcome channel only allows newcomers to read and „react“ via emojis
In order for a role to be automatically assigned if you, for example, agree to the server’s guidelines as described above, we need a bot. I use Zira for this purpose. If you’ve done all that, you’re almost save from automated attacks – so far I have not seen a bot trying out all the reactions to get any roles. Of course, people can still read the text, agree and spam, or even teach a bot to do just that. But the hurdle and needed effort is already much higher and makes this much less likely to happen. Still, you should not leave it at that and make further security arrangements. Discord offers some by default under the server setting „moderation“. Here you can set a verification level – how long a user must already be on a server before he is allowed to write. There is also a message filter which should find inappropriate content. And finally, 2-factor authentication so you are only able to log in with a code that you get on your phone.
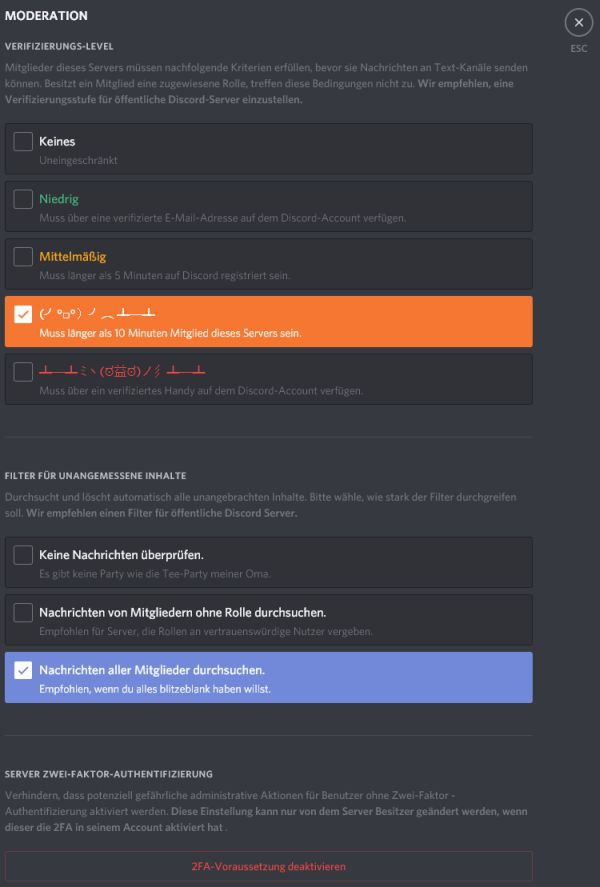
Moderation help by Discord
Content Creation
Now we get to the contents of our Discord server. We want to provide news, a place to discuss various relevant topics and support. Since our game is still in the early stages of development, news weigh the most because you still can not discuss much nor need help. It is therefore a good idea to set up a news channel in which we report regularly on updates.
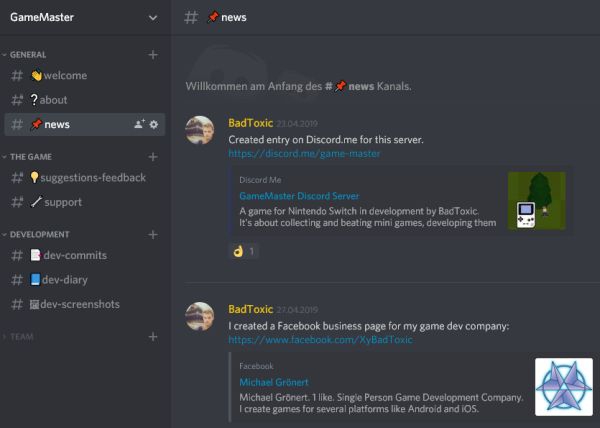
The first channels on the GameMaster server
Wouldn’t it be great if this got done without additional input? We may already (or additionally) post our news to other places, such as Twitter, Instagram or Facebook. Can’t we automate this process so that we only have to post in one place and it spreads everywhere? There may not be a perfect all-in-one solution but there are some widgets that will help you with this job. I’d like to show you IFTTT („If This Then That“) and zapier, two platforms that allow all types of services to be linked together. The free version of zapier sadly comes with some restrictions. I used these to connect different social networks with Discord. For example, my new Twitter, Instagram or Facebook posts will automatically land on different channels of my BadToxic server.

My „applets“ on IFTTT
Discord uses so-called „webhooks“ to accept data. Some services already offer to connect to such webhooks. GameMaster versioning is taking place at GitLab, which already offers such integration. Since I do not want to make my source code publicly accessible to everyone in this project, the repository is set to private. If we would use the native integration, we would receive messages on Discord but they would be without content. The users on my server would just see that there was an update to the game but not what was updated. To solve this problem, I use zapier, which logs into GitLab in my name, so it can read the updates and send them to Discord.
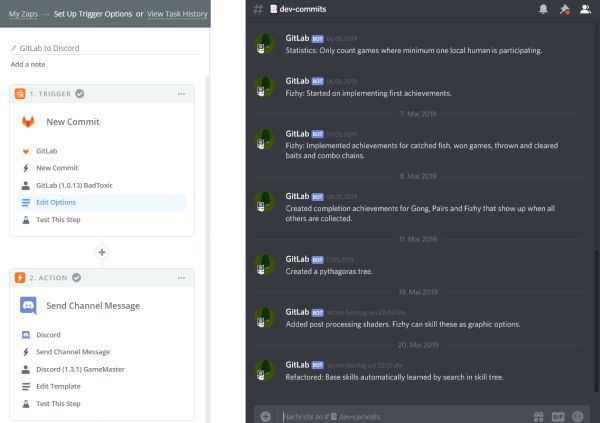
Left:GitLab „Zap“ in zapier; Right: the receiver channel on Discord
Maintenance
Last but not least, I would like to talk briefly about the maintenance of the server. Large communities usually have several moderators who care of keeping up order and help people. I would have to take over this job alone if there were no digital friends – bots. Dyno supports me in this task, a free bot for automatic moderation, logging actions, streaming music in voice channels and much more. For example, it can respond to predefined forbidden words, delete the message in question and warn or even ban the user. Or you can set „cooldowns“ for certain actions – a user will be warned if he sends links several times within a few seconds.
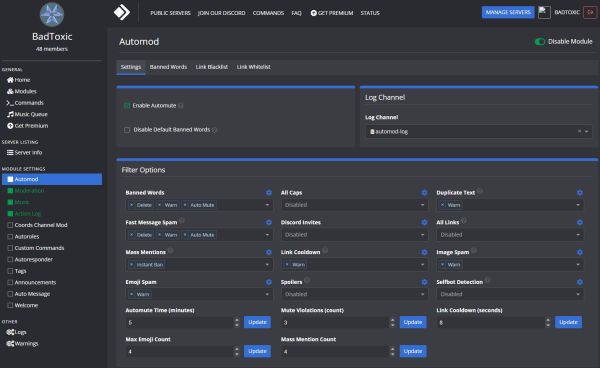
Settings of the automatic moderation in Dyno
To me, the most useful features are the logging functions so far. Various actions can be logged in different channels. For example, I can see if someone left my server, which would not be possible without extra tools or manual observation.
With this, we should have covered the issue of communities thoroughly enough for now. Next time, we’re going over to shaders which we want to use to polish up our graphics and realize special effects. In fact, they even become an important part of the game mechanics themselves.
Do you prefer to read this diary in the developer’s mother tongue? Then click here to read this diary entry in the original German language! ##neue_seite##
##titel:Part 21: Shaders and Particles## Part 21: Shaders and Particles
Today we will look at Shaders (originally used for shading – the production of appropriate levels of light, darkness, and color within an image). Shaders are hardware or software modules that implement certain rendering effects. In our case, shaders are small programs that can run efficiently on directly dedicated units of the graphics card. They are written in special languages, such as GLSL (OpenGL Shading Language), or HLSL (High Level Shading Language). If a device or graphics card is missing the shader units, the shaders have to be calculated with the CPU, which is much slower, or they have to be omitted completely. But do not worry, this time I won’t go too deep into the technical details, either. We’re gonna take a look at the results that we want to achieve with shaders rather than their concrete implementation.
Objectives: generation switching
We want to develop the mini games in GameMaster. From simple pixel graphics we know from Game Boy to pretty 3D graphics. In theory, this means we would have to make our own graphics for each variant – a huge effort. But there are tricks to make our graphics look older and more pixelated without much work. „Post Processing“ shaders allow us to manipulate individual pixels and their colors to make the result look like it’s on a weaker device with limited technology. One can imagine that, for example, four or more pixels are combined to one which has the mean value of the pixel colors. In the case of our GameGuy, which should be similar to a Game Boy, we are restricted to four colors or grayscale. So our pixels get the color closest to those four.
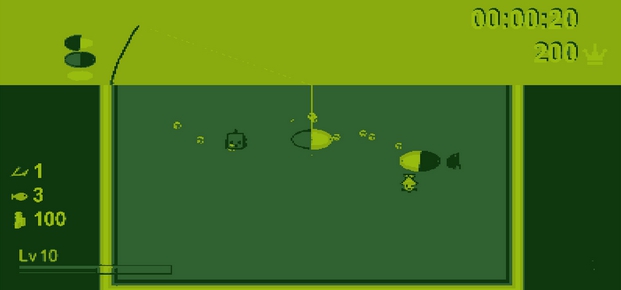
A monochromatic 8-bit version with four shades of gray
I can reuse the fish and bait graphics from my older Fizhy version but still have to rework the fish for the 8-bit variant. Of course, there’s a lot more that needs to be done for the 2D versions, like putting on the water and the basin, or adjusting camera settings, but since today’s diary entry is about the shaders, I’ll limit myself to the graphical results.
Same goes for the next stage of development, which is similar to an NES (Nintendo Entertainment System). An NES can already display 16 to 25 of 52 colors simultaneously. The shader does not have to be that strict, it just has to look like that and this is easier.
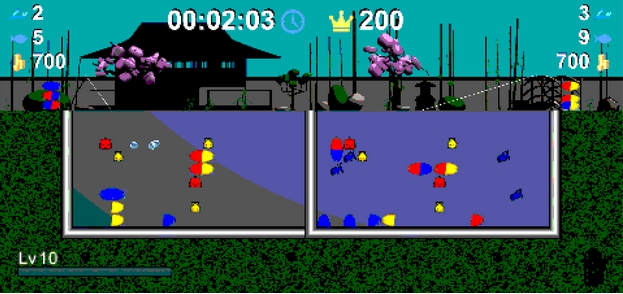
The colored 8-bit version
For this version I add a few landscape details from the Japanese zen garden. But something is missing for the right retro feeling. The picture resembles a typical NES game but at that time the TV also contributed greatly to the look. This can also be recaptured with a shader. For this I use a CRT shader simulating a cathode ray tube screen. Roughly speaking, it makes it look like the pixels of a CRT monitor are visible in their individual colors red, green and blue. Furthermore the typical curvature of the picture surface.
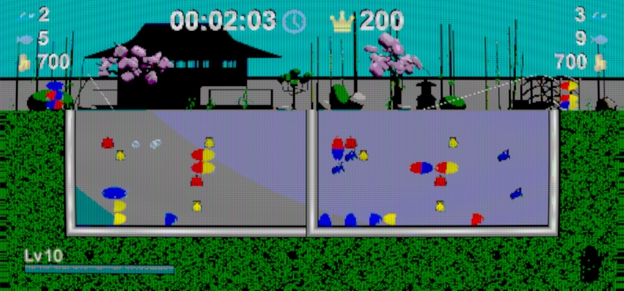
Again the colored 8-bit version, but with CRT effect
Next, I’m offering a 16-bit version, which roughly resembles a SNES (Super Nintendo Entertainment System). With its 15-bit color palette, this console already provides for a tremendous upgrade. For this I model an extra variant of the Japanese zen garden, which I also use for the 8-bit edition. Again, the CRT effect is appropriate.
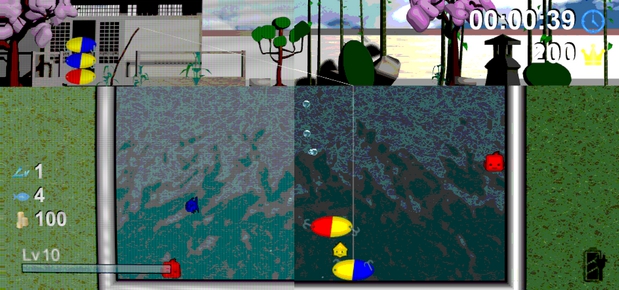
The 16-bit version, on the left with CRT effect, on the right without
The following 32-bit version you already know from previous diary entries. But also for this I create two special shader variants for experimentation fun.
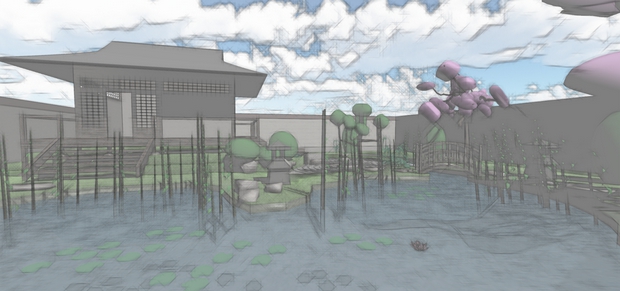
The pencil shader gives the world an appropriately penciled look
First we have a variant here that should look as if it had been drawn with a pencil. And second, my personal favorite, a neon version. Whether and how I will reasonably incorporate this into the game, I do not know for sure. Maybe I’ll just offer it for fun.

A neon shader – I love this variant
Visual effects
Shaders are not only suitable for post-processing the image but can also generate specific visual effects. I have already implemented a few of them in Fizhy. However, most of these effects are realized via particle systems which is another technique altogether. It can be used to animate a large number of objects. For example, particle systems are used to simulate fire, smoke or explosion effects. If you compare the following Fizhy screenshot with an older version, you see that a lot has happened. Actually, the differences can be seen best in the moving picture.
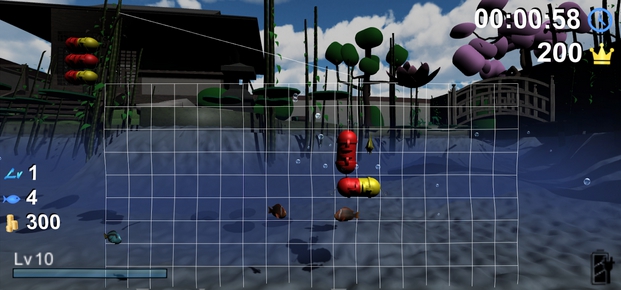
The usual 3D (32 bit) version
First, you’ll recognize some bulges on the ground. These are realized via shaders and move at a constant pace. In fact, this looks like water reflections on the floor. Usually this is done by projecting textures onto the desired area. I discovered this alternative while experimenting with shaders and consider it quite efficient. Next, you can see a kind of blue fog in the water, which should increasingly limit the field of view in the distance. This is realized using particles, although shaders can usually achieve a good fog effect, too. I opted for this less efficient method because it was problematic in my shader experiments to be able to see the fog-free surface through the water. Certainly this problem could be solved in another way but the area is new to me and I want to move forward. Furthermore, you can see small bubbles which rise randomly and preferably with the movement of a bait, rising up to the water surface. These too are particles that use small images. Finally, there is a particle effect which occurs when a bait is thrown into the water, seen in the next screenshot.
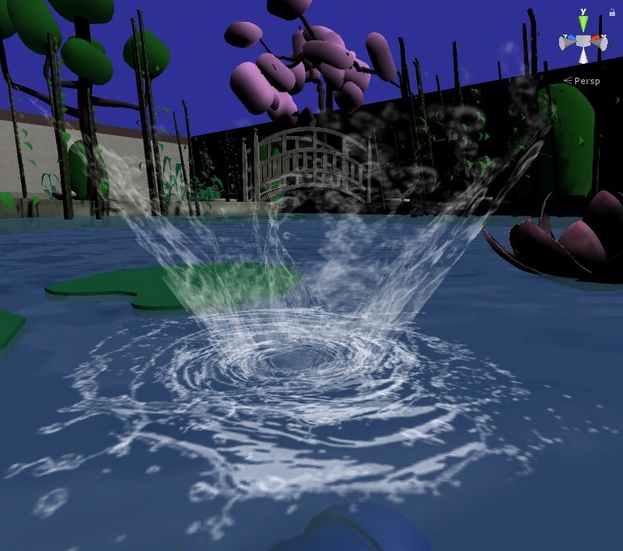
Particle splash effect when a bait falls into the water
Impossible objects
Now we get to something very special. Shaders can also show effects that are not possible in reality. Imagine a portal, for example. Like a window to another place, another time or reality. Or you walk around the same pillar three times to suddenly come out somewhere else. A perfect example of something that drives a lot of such effects to the extreme is the game Antichamber.
At first, I only studied these techniques out of interest, not because I planned their use from the start. But I would like to introduce a cornerstone of these techniques, which already makes it into the game. I create some kind of playing card which carries its own three-dimensional world in itself. This world is visible only through the „window“ of the card, you can not look around it. In a way similar to a holographic effect which adorns some trading cards but not limited to a few angles. In the following video you can see a finished example of such a card.
I want to create these cards for all mini games and they are meant to be a kind of trophy for „beating“ each mini game. What exactly that means, I’ll decide later. For example, you may have to find all or a certain percentage of achievements.
To roughly explain the functionality: All objects within the card world have certain materials, all of which have the same index as a shader variable. The card window has a kind of shader mask with the same index and acts as a counterpart. The shaders are instructed to draw the pixels of the objects only when overlaid by a mask of identical index. I provide a simple version of this card as a free download. Firstly on GitLab, where you also have a WebGL preview and on the other hand, as my very first product there, on the Unity Asset Store. For the latter, a little more effort was needed in form of polished pictures in different sizes, explanatory texts and adherence to a number of guidelines. In fact, I had to send in my card three times until it passed the multiple-week-long verification process. Theoretically, this store could of course serve as a source of income, but currently I do not plan on doing this. Here you would have the advantage of being able to import the card directly into your own project without any effort.
Now you have already seen some examples of what is possible with shaders and particles. With that I want to come to an end for today. Next time we’ll take a little trip into the landscaping of our „overworld“ and deal with grass which even bends when you walk through it.
Do you prefer to read this diary in the developer’s mother tongue? Then click here to read this diary entry in the original German language! ##neue_seite## ##abschnitt:2020##
##titel:Part 22: Overworld Landscaping## Part 22: Overworld Landscaping
Following up on our previous diary entry, we continue with graphic effects. We want to upgrade our hitherto dull landscape outside the mini games. In this regard, today we are dealing with two topics. On the one hand a special tree and on the other grass which moves in the wind but also reacts to the players.
Pythagoras Tree
The special thing about a Pythagoras tree is that it’s not a plant but a fractal. That is, geometrical figures that repeat recursively according to mathematical specifications. In this case it is the Pythagoras theorem which presumably everyone may know from school mathematics. It states that the area of the square whose side is the hypotenuse (the side opposite the right angle) is equal to the sum of the areas of the squares on the other two sides. Or expressed in a formula („Pythagorean equation“), which probably should have been easier to remember: a²+b²=c².
Illustrating the Pythagorean theorem on Wikipedia
Said tree now uses these forms recursively and adds more triangles and squares with identical aspect ratios to the first squares. The whole thing can be quickly understood by looking at the following video, in which I implemented my older (2013) implementation of such a tree with the Game Maker: Studio game development software.
You can try a HTML5 version directly in your browser, or download from my homepage. The edges of the base square can be changed freely, as well as the upper corner of the overlying triangle. This can already generate many different fractals. A few colors and textures can make the whole thing more interesting and the optional wind brings it to life
.
Now I was after imitating the whole in unity in 3D. Since the third dimension does not really matter in the calculations, this should not be more difficult. However, the used languages and techniques differ widely, so it still was a challenge. I will spare you the mathematical details, but for those interested I provide the source code on GitLab.
Such recursions can even quickly make a PC of today show its limits. It remains questionable in which form I will use this tree finally in the game. However, it is likely that there will be no Pythagorean forest, meaning such resource-hungry trees will be a rarity.
Interactive grass
Now to something that will improve the almost desolate landscape – a meadow. In order to implement grasses, shrubs, flowers and more in Unity, there are many different approaches. However, I opt for certain requirements that severely limit this selection. I want our players (and possibly other things) to be able to interact with the grass and that the grass is moving in the wind. For example, the blades of grass should bend aside when a player steps on them and then straighten up again after that.
I search specifically and extensively for instructions and sample code on this topic and find it. In the end, I try to create a combination of different examples. I do not want to withhold the most important findings: Linden Reid’s “Waving Grass Shader in Unity“ and Minions Art’s “Quick Game Art Tips – Interactive Grass Shader“. The efficient way to do this with shaders has the disadvantage that I find it hard to understand everything in this area but that’s something you have to deal with. Theoretically, everything is explained in detail in the mentioned tutorials and can be carried over for the most part. In practice, unfortunately, not everything is always so easy and there can be contradictory prerequisites if you want to combine two different shaders.
Wavy wind from Linden Reid’s Tutorial
The linked tutorials already describe most of it, which is why I do not want to look at everything in detail, but I’ll give you summaries. The wind, which seems to be spreading in a wave, is realized by a scrolling gradient.

Gradient texture from Linden Reid’s Tutorial
Blades of grass are bent in accordance with the brightness about their position in the gradient. For example, you can assign bright for right and dark for left. In addition, the elapsed time is added to these coordinates, causing the waves to move in a steady state (as if the gradient was scrolling endlessly).
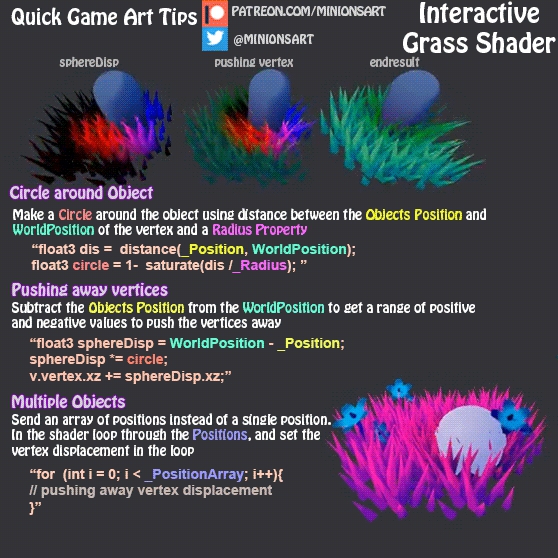
Blades of grass bend interactively in Minions Art’s Tutorial
The interaction with the grass is simpler to understand and it is easy to get an idea how it can be implemented. But without experience with shaders, every little thing can be a challenge. For example: How do I get the position of an object in the game into the shader? Luckily, since we do not write any very technical diary entries here, you’ll be spared going over what else can go wrong, even if you already have tutorials with sample code. Long story short, blades of grass bend in the opposite direction to an object that they are supposed to interact with as soon as it falls below a certain distance. That sounds easy, right? Since the above graphic and the linked tutorial already well illustrated and explained the subject, I will leave it here already.
And that’s how it all looks in practice, in GameMaster. In the video we also see blue mushrooms, which glow in the dark, as well as flowers. The 3D models used have different LOD (Level of Detail) variants. This means depending on how far the camera is from them, the models either have more or less details. This is to make sure that individual objects are less computationally intensive if they are in the picture in larger numbers at the same time. This, however, has the disadvantage that the different model variants, with respect to our grass shaders, also behave differently, since they use different numbers of points (or vertices). One would have to configure the values of the shaders per model and detail level in order to achieve the best possible results. Much of my time on this topic has been taken up by optimizing these values.
With this I finish today’s entry. Next time, we’re taking our game character to a new dimension, and with it the overall look of our game – we’re using three-dimensional manga-style characters from VRoid Studio. See you soon!
Do you prefer to read this diary in the developer’s mother tongue? Then click here to read this diary entry in the original German language! ##neue_seite##
##titel:Part 23: 3D manga-style characters## Part 23: 3D manga-style characters
It’s time to change our game characters. This flat Paper Mario style also has a certain charm but I would like to strive for something much better. So far, very simple 2D graphics were used, which I made over ten years ago for my first games. Low-resolution pixel-style sprites – flat images in a three-dimensional world – that can be a matter of taste, of course. But if we look at it from a technical point of view, the decision becomes easy: Suppose we want different characters, different genders, ages and sizes. We may want to dress them differently. For every combination of these (and possibly other) values, you would have to make multiple images for each type of movement or animation of the character – an amount of effort too large for me alone. So we need a generic approach, where as much as possible can be reused.
What are the options?
OK, I do not want to make the sprite variant any worse than it is. Of course you could also use tricks here and combine several pictures to save yourself a lot of drawings. For example, different hairstyles and clothes could be placed on top of the body. Or we also assemble the body from individual parts, such as torsos in various forms. Then you could scale the body part images individually, so you do not need different variants. This could be done with blend effects to change skin and clothing colors. As you may have noticed you can generalize, automate and simplify it more and more, but at what cost? Of course, the computational effort increases drastically when you suddenly have to draw ten graphics with different scales and blend modes instead of only one. And of course, the distortions that may be caused by scaling do not look so nice.
There are animation programs that can combine these things in perfection and produce professional results. I’d like to introduce you to one of those that made it to my final selection – Spine. Spine is a 2D animation software that connects single frames to bones which can then be moved. In addition, individual areas of an image can be scaled to different degrees, which can create stunning effects. You can do it so good that 2D images even look three-dimensional. But see it yourself in an example on YouTube:
With this solution you would have to draw much less, but also much better. Because edgy pixel graphics do not fit with such liquid movements – if you want to use the potential of Spine.
Another option I’ve considered is modeling and using voxel objects. In the end, they are angular pixel graphics as well, just in 3D instead of 2D. These in turn I could animate fluidly without making it look ill-fitting. We know voxels from Minecraft, for example, or when it comes to animating angular and inflexible bodies – Lego games and movies. Construction with small blocks is something I think I can handle a lot better than modeling high-resolution 3D figures. In another context, I’ve also tried this with the free software MagicaVoxel. How to do this you can see in my timelapse video in which I build the Monas in Jakarta (Indonesia):
To animate the afore mentioned voxel characters or 3D characters in general you can download free animations for humanoid characters from Mixamo for example. It is not necessary to animate everything yourself. Although this variant with voxels and ready-to-use animations is very appealing, nevertheless I continue to look for something better. Since I often see games that feature manga characters that look better and more professional than the rest of the game, I specifically research them. In addition, manga characters would suit my game quite well. And indeed I find something: VRoid Studio for making three-dimensional manga-style characters. For this software I have also made a video in which I experiment with different values:
You first select the gender or directly from a template. All sorts of things can be changed, such as lengths and thicknesses of the limbs and several details of the face, which can portray many different emotions. There are web portals where users can offer their works (characters and clothes) under different licenses. Here I also found the black dress, free and commercially usable, which can be seen in the video. Also, I show how hairstyles can be created relatively easily.
My choice is made
With how impressed I am with these manga characters and how easy they are to create, it makes my decision rather easy. I’m also taking into consideration that the aforementioned Mixamo animations also work with these characters. So far so good, but how do I get such a character into my game? The .vrm format offered by VRoid Studio is not supported by Unity. The steps I have taken to accomplish this may already be out of date at the time this diary entry was written, so I will not go into them in detail. In addition to two Unity plugins (UniVRM and VRMtoPMXExporter), post-processing in Blender was also required. There are also easier ways, depending on how much control you want to have over the individual components. For example, you can have a single texture for the entire character in the end, or you can have individual texture images for all components of clothing and body. If you want to see the available methods, just search for „Vroid Studio To Unity“ on YouTube .
Now it’s time to move and animate the character. The movements already exist with our current sprite character. But instead of mirroring it vertically depending on the direction so that it can at least look to the left and right, we will now rotate the character around the Y axis so that he can always look exactly in the walking direction. And instead of constantly switching the pictures for an animation, the individual body parts have to be moved smoothly. As announced, we are using ready to use animations from Mixamo. We find what we are looking for using the search term „walking“.
Walk animations in Mixamo
Here we choose what we like and a format that is supported by Unity. You can choose directly from a „FBX for Unity (.fbx)“, which we would like to use „Without Skin“. We can also set how many frames per second we want and whether we want a „keyframe reduction“.
With these settings we download an animation
In Unity, we then have to adjust a few settings such as setting the animation type to „Humanoid“. We can leave most of it unchanged. But we have to estimate some things by trying them out. For example, it can happen that we have to make adjustments in the „Animations“ tab, such as „baking“ root transform positions on certain axes into the pose. It’s also worth mentioning that the animations move our character directly, so our walk animation really lets the player walk forward and not only moves the legs. With exactly these settings we can influence such effects.
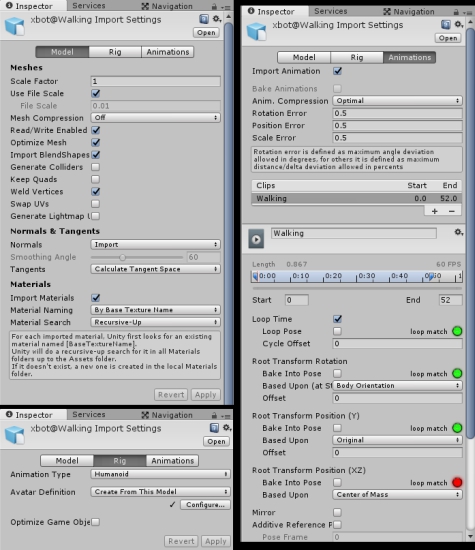
We have to adjust a few options in Unity
And then appropriate animation processes and transitions can be modeled. To do this, we create various states in the „Animator“ tab of Unity, each of which stands for an animation and connect them to each other via transitions. The transitions each require conditions that must be met in order for them to be triggered, such as a variable taking a certain value.
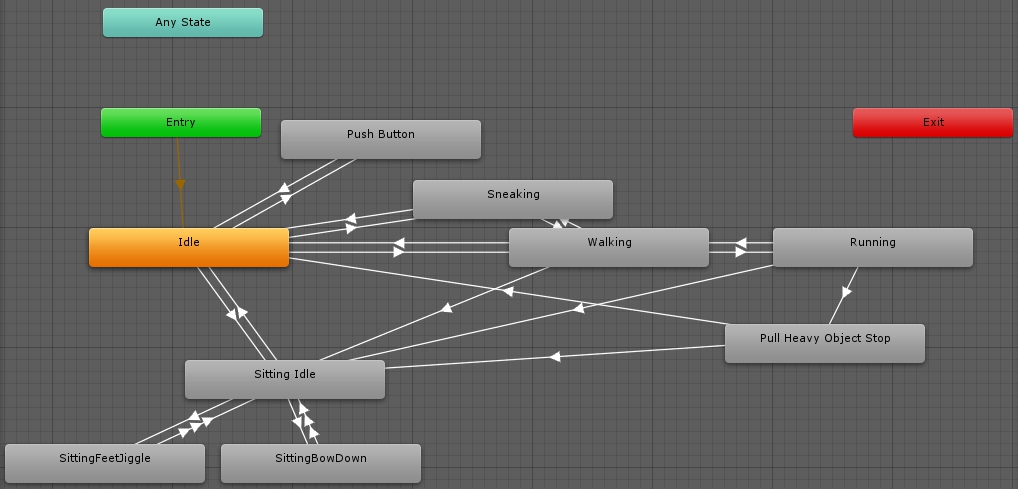
States and transitions in the animator
In the screenshot above you can already see further animations with their transitions. For example, if the player interacts with a bank, they change to the „Sitting Idle“ state. After a few seconds, another seating animation is started at random, which is supposed to make the character sit a little differently in order to create a realistic variety.
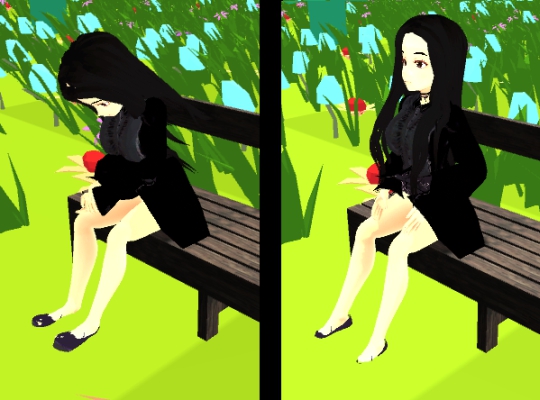
Bent down or straight – various seating animations
One important thing I would like to mention: In almost all downloaded animations I notice problems with the alignment or rotation of the feet. These are partially twisted by an unrealistic 180°. Google shows that this is a common problem. In order to eliminate it, „IK“ („Inverse Kinematics“) checkboxes must be checked. These can be found at different places in the Animator tab. If you’d like to find out why these settings are necessary, the best way may be doing a Google Search. Unfortunately, I have to say that the problems cannot be solved in this way with all animations, as far as I have learned so far.
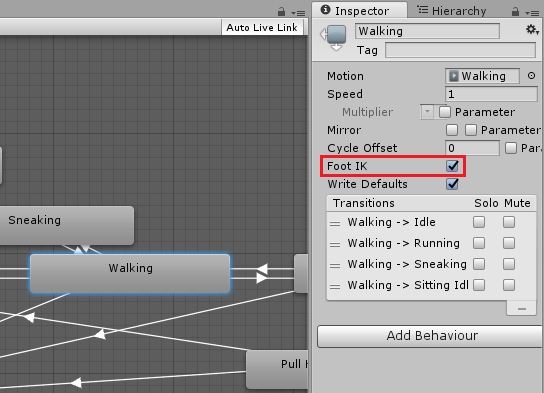
Important option for correcting foot alignment
I think I have written enough on the topic for now – I mentioned different possibilities for character design and slightly deepened my first choice. I say goodbye with a video of my first manga style character in motion.
Next time we’ll start implementing another mini game, so to speak. This time it will (at first) take place directly on the „world map“ instead of in a virtual console. And it should satisfy hunger… See you soon!
Do you prefer to read this diary in the developer’s mother tongue? Then click here to read this diary entry in the original German language! ##neue_seite##
##titel:Part 24: „Cooking“ hamburgers together## Part 24: „Cooking“ hamburgers together
Today we’re starting another mini game. However, I plan to implement just the basics at first and complete it at a later date. We are also doing it very differently this time: Instead of starting the game as an independent project like we did with Fizhy, it will be built directly into our main game. It will also take place (initially) directly on our „overworld“ instead of in a console. The reason for this is that we use our game character directly for it and do not want to design another as a console version. In addition, be warned – the following chapter could stimulate your appetite!
Planning a cooking game
Farm games or cooking games are plentiful. Nevertheless, they can differ greatly in gameplay. I would like to use the game Delicious World as a guideline, which I liked surprisingly much. However, I found that a predecessor of this game (from the same company), is much less fun despite the game mechanics being almost identical. There are little things, such as that in one game an action runs automatically, while in the other another click is necessary. For this reason, good planning with such games is much more important than with many other genres.
The basic principle is easy to explain: we want to prepare food and sell it to customers. Customers place orders and we cook what they want. We collect the appropriate ingredients in our kitchen and use various kitchen appliances. We then serve prepared food to the customer who pays us for it. When a customer has finished eating, we still have to prepare the table for the next few people.
Now we come to the further details which already have a big impact. Depending on how long it took us to prepare the food, we get a larger or smaller tip. If we take too long, the customer leaves our restaurant angrily. An order can consist of several things. So it also matters whether we can serve everything at once, or whether we bring everything individually. We can do that with combo bonuses – more points if you serve everything at once. On the other hand, you can extend the time that a customer is willing to wait for their food if you have already served some of it. This raises the first questions: Does the customer wait until everything has been served? Or do they eat a part and then leave after waiting too long? Will they then at least pay for this part? There is also a waiting time for tables. New customers wait a while when everything is full before moving on. So here is another reason to do everything quickly. Kitchen appliances also take time. Some can work independently, such as boiling water, which only needs to be put on. Others require the presence of the player, such as cutting vegetables. Stand-alone devices may need to be stopped in time, such as removing something from a pot or pan. Others finish pretty much by themselves and cannot start a kitchen fire like a coffee machine.
The menu
In our concrete variant, we initially offer hamburgers. These consist of meat patties which are fried and then served on a bun. Everything else, such as salad and cheese, is optional and will be implemented later. First we take care that we work out the entire process with just this to offer.
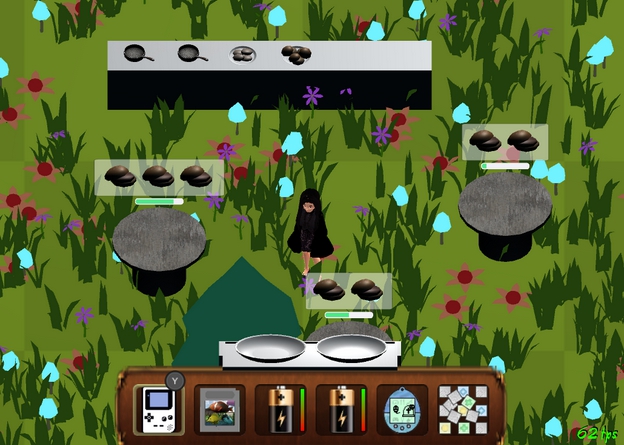
Overview of our restaurant
As can be seen in the picture above, we have kitchen equipment (top) with two plates, from which we can take the patties and buns. On the left are two hot plates with pans in which we can fry the patties. Above our item hotbar (bottom) we see a tray with two plates on which we can transport the prepared food to the customers‘ tables. Three of these tables can be seen, above each the „different“ orders are displayed. Progress bars can also be seen directly below the orders, showing how long the customers are willing to wait. Visible customers themselves are not necessary for now.
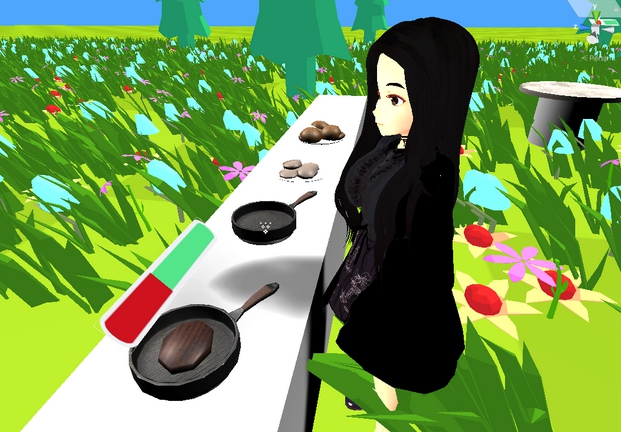
Frying burgers is fun!
If we press the action button while standing in front of the plate with the meat patties, one is placed in a free pan, if available, and the frying begins. A progress bar is now also shown here. But this one has two levels so to say: First a green bar fills up. If it is full, the meat can be removed. As soon as it is full, a red bar also begins to crossfade it. When it gets full, the meat is burned and can only be disposed of. So it should be removed from the pan in time. But this only works if we already have a bun on one of our two plates on which there is no other patty. So we cannot store the fried food somewhere.
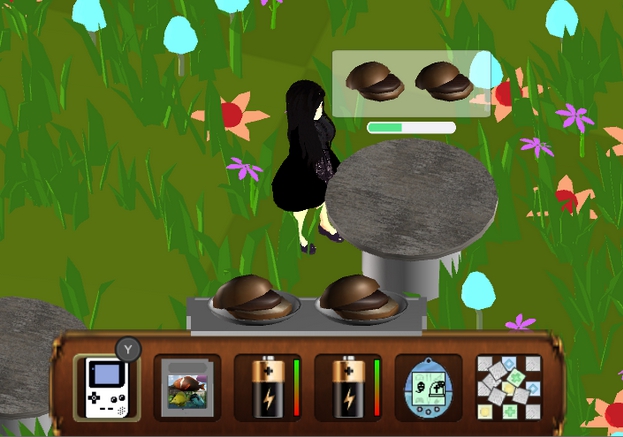
Exactly what we have on the tablet is being ordered here
With the finished burgers on our tablet, we then go to a table and serve them. These then get consumed and leave a dirty table. Finally, we have to clean the table, which is also indicated by a progress bar, and the whole process can start all over again.
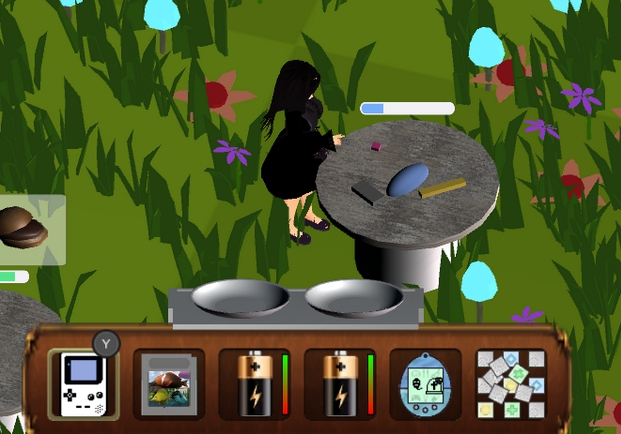
The table needs to be cleared and cleaned.
Outlook
I think you already get a pretty good idea of how it should work. Of course, we also need other ingredients, such as the salad and cheese already mentioned, and other offers such as fries and drinks. I also want to make various things upgradeable – more plates on my tablet, more tables, or a larger restaurant, new food offers. Since GameMaster is all about developing games, this is a good option. Other elements can also be included, such as decorations that affect how long customers are willing to wait or how much to tip. A multiplayer mode, which also works online, has already been implemented. Other players can join in and see the actions of others. However, in the future I will be reluctant to program multiplayer things – Unity has long stated that their underlying network implementations will soon be replaced. Scripts on which my multiplayer depends have been marked as „deprecated“ and are not even delivered with the current Unity versions. Therefore, I should assume that in the future I will have to rewrite the entire multiplayer system to keep up with the times.
At the end of today’s diary entry I would like to inform you that I am dropping 3DS support. Of course it was to be expected that my project would still take a lot of time and it is unrealistic to implement a 3DS variant so late. Since the 3DS compatibility slows me down a lot and prevents me from upgrading to newer Unity versions, I have now finally decided to drop it.
Next time we want to individualize our game character. So without creating a new one with VRoid Studio, as we did in Diary Entry 23, we will investigate to what extent we can change this within Unity. See you soon!
Do you prefer to read this diary in the developer’s mother tongue? Then click here to read this diary entry in the original German language! ##neue_seite##
##titel:Part 25: Character Individualization## Part 25: Character Individualization
We are used to being able to put together our own characters in RPGs and other games. We choose the gender, regulate height and stature and can adjust many different details. In diary entry 23 we created a 3D manga-style character, but so far it has remained as we created it with the VRoid Studio program. Today we want to explore how we can change the look of this character within Unity and our game.
What can we manipulate?
To find that out, let’s examine the player object we got from VRoid Studio after the conversion process. In the following screenshot you can see an already slightly refined version of the object hierarchy, which we then merged with our player.
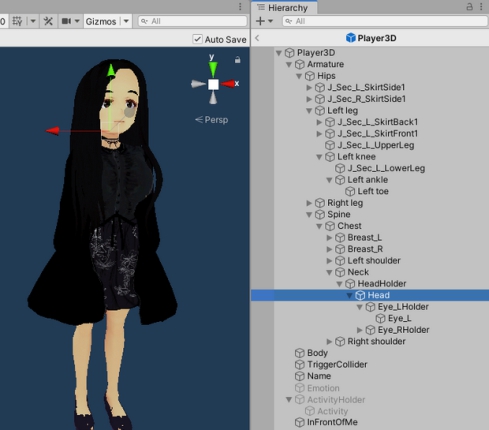
Structure of our player object
Under „Armature“ we find a lot of nodes that stand for different body parts and joints. For example, the legs and the torso or spine extend from the hip. From there it goes to the chest and from there to the shoulders and to the neck. The basic idea is that we scale these individual parts differently, i.e. stretch or compress them, in order to obtain new proportions. But is it really that simple? No, of course it is not. First of all, you have to notice that all parts below are being distorted as well. For example, if we want wider shoulders, the arms will also have a larger diameter. But of course only on the axis that we are changing – so wider shoulders create an oval arm cross-section, which we do not want. There are also rotations between the nodes, which makes the whole thing a bit more complicated. So changing the X-axis of an object can also influence the Y-axis of the child objects instead of their X-axes. Probably even pro rata – around 20% the X-axis and 80% the Y-axis.
So if we want to change individual body parts, we have to compensate for the changes in their child objects. For example, if we make the arms 10% longer, we have to make the hands underneath shorter by 10%. To do this, we need to know which axes of the child we have to adjust by how much in order to achieve the 10% overall. To stick to this example – maybe shorten your hands by 6% on the X-axis and 2% on the Y and Z-axes, respectively. Calculating what needs to be changed and by how much seems to be more time-consuming than trying it out, even if it turns out a bit rough.
How can we do that?
Planning the implementation is even more difficult. We want a UI where we can use sliders to change different parts of the body. The code behind needs references to the individual body parts that are supposed to be changed. So we create a „CharacterCustomizationController“, as I called the C# class, which gets a „player“, runs through it independently and collects the references based on the node names so that they can be accessed directly later on. Each slider of a changeable body part gets a range of values according to a sense of proportion – a minimum and maximum stretch or compression. And now the tricky part: In addition, each slider receives a list of references to other parts of the body that are to be scaled to the exact opposite for compensation. For each of these references we need a 3D vector which indicates the proportions to which these referenced body parts should be scaled and on which axes.
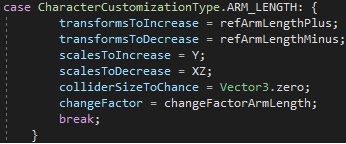
Code example: Necessary references and scaling vectors to change the arm lengths.
In order to find out everything necessary for this, a lot has to be tried out – one says „Trial & Error“. And this accumulates a number of values that also want to be managed. We need average default values that match the initial situation best. Then there are the minima and maxima and a factor by how much a scaling changes when you move the slider by a certain distance. The minimum and maximum can of course result from the factor (or vice versa), since the sliders have a fixed value range from zero to one.
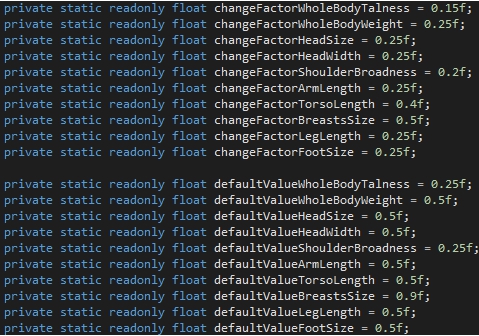
Code example: Necessary factors and standard values for ten changeable body parts
These values have to be saved and loaded and also have to be transmitted in multiplayer via network so that you can see the settings of other players. However, I will not go into more detail here, since it is mainly a lot of writing effort and the storage system and communication via the network have already been mentioned in previous diary entries.
The graphical realization
At the push of a button, we let the camera move and zoom to our character in the middle of the game at any time. We have a two-part user interface: the categories of body parts can be selected on the left and corresponding sliders are displayed on the right. In the video above you can see a very simple and early implementation. Only standard Unity UI graphics are used here and keywords describe the functions. In my opinion, such texts aren’t very pleasant to look at and you have to put more effort into translating the game into several languages. So I consider how images can achieve the same meaningfulness. In the following video you can see how I implemented it in the end – simple figures, each of which shows what is changing. For the body categories on the left, entire body areas are marked in blue. The concrete axes are shown on the right-hand side at the affected points. In addition, the user interface is now more compact, only stays at the edge of the screen and is minimally more attractive in design.
It is finished
So we have achieved our goal. In fact, I only implemented settings for the body parts for which it was possible with reasonable effort. I also experimented with parts of the body where the distortion of the child nodes was so severe that I couldn’t easily compensate for them. But you can also think of a few other options. For example, we can change the colors of the skin, eyes and hair. Other clothing is also desirable, but probably not easily interchangeable, as it is currently an integral part of our player body. But for now, that should suffice for character individualization.
And with that I want to say goodbye for today. Until next time – then we want to create a smooth transition between the Overworld and the mini games by taking our “GameGuy” handheld out of our pocket and starting a game on it.
Do you prefer to read this diary in the developer’s mother tongue? Then click here to read this diary entry in the original German language!